admin

List of all our PDFs for Raspberry Pi, Arduino and Microbit

 Raspberry Pi, Uncategorized  Comments Off on List of all our PDFs for Raspberry Pi, Arduino and Microbit
Jul 032018
 

Most popular PDFs – last updated 17th November 2022.

If you find these guides useful, many of the parts required are available in our eBay shop https://www.ebay.co.uk/str/convertstuffuk

UPDATED: How to send email messages and photos from the command line on Raspberry Pi Bullseye or Buster using MSMTP. Updated November 2022. pi-email-2022-update.pdf

Digital Alarm Clock project kit for Raspberry Pi Pico board. Uses a TM1637 4 digit 7 segment LED board linked to a Pi Pico or Pi Pico W board to display the time, scroll messages, and be an alarm clock. PDF https://www.securipi.co.uk/pi-pico-clock-kit.pdf and Thonny MicroPython code examples in a zip file.

Wireless-Doorbell-Pi.pdf – How to use a Raspberry Pi to receive signals from Llloytron MIP wireless doorbells. Examples show you how to email a photo of the visitor to your mobile phone, and show how to play a custom MP3 file when the doorbell is pushed. Uses RXB6 433MHz receiver board attached to the GPIO pins. You can buy a full kit here.

OpenCV4.pdf – Guide to setting up OpenCV 4.1.0 on a Raspberry Pi 4 2GB or 4GB running Raspbian Buster. Includes several Python 3 example scripts showing you how to do face detection and MOG movement detection algorithm, for Pi camera and our Video-2-Pi USB video grabber.

jetson.pdf – Guide for setting up and using the GPIO pins on the Nvidia Jetson Nano board.

remote-433-receivers.pdf – How to receive and transmit 433.92MHz signals from cheap wireless devices using your Raspberry Pi. Learn to clone signals from generic remote control wireless mains sockets & turn them on and off using python code. Also scripts to clone & fuzz wireless devices. (updated 23/11/2022)

rc522.pdf – Guide to using the RC522 13.56MHz RFID reader with a Raspberry Pi. Wiring diagram for SPI interface and also connecting an LED to the Pi’s GPIO. Python3 code examples for reading the UID from cards and keyfobs, turning on the LED (or a relay and door latch) for 5 seconds when a valid card is presented. Also code for writing a logfile of date, time and user for all successful entry attempts.

esp01.pdf – Guide to using the ESP01 version of the ESP8266 board for IoT experiments. Learn how to turn an LED or relay on and off from the web browser on your mobile phone – including example code. Uses the Arduino IDE to program the ESP01 boards. Advice on which programmer boards work best and how to modify certain versions of the ESP-01 Relay board so they actually work. Useful information for anyone exploring ESP8266 or ESP32 boards.

cc1101.pdf – Learn to use the Texas Instruments CC1101 wireless chip boards with a Raspberry Pi. Send and receive on 315MHz, 433MHz, 868MHz and 915MHz ISM frequencies. Support for 2-FSK, GFSK, ASK/OOK, 4-FSK & MSK modulation schemes. External RP-SMA antenna socket – so it’s simple to add Yagi antennas for long distance comms. Uses SpaceTeddy CC1101 library for Raspberry Pi. Examples show you how to have a PIR attached to one Pi send a message to another remote Pi when triggered. Also how to receive message via a BASH shell script.

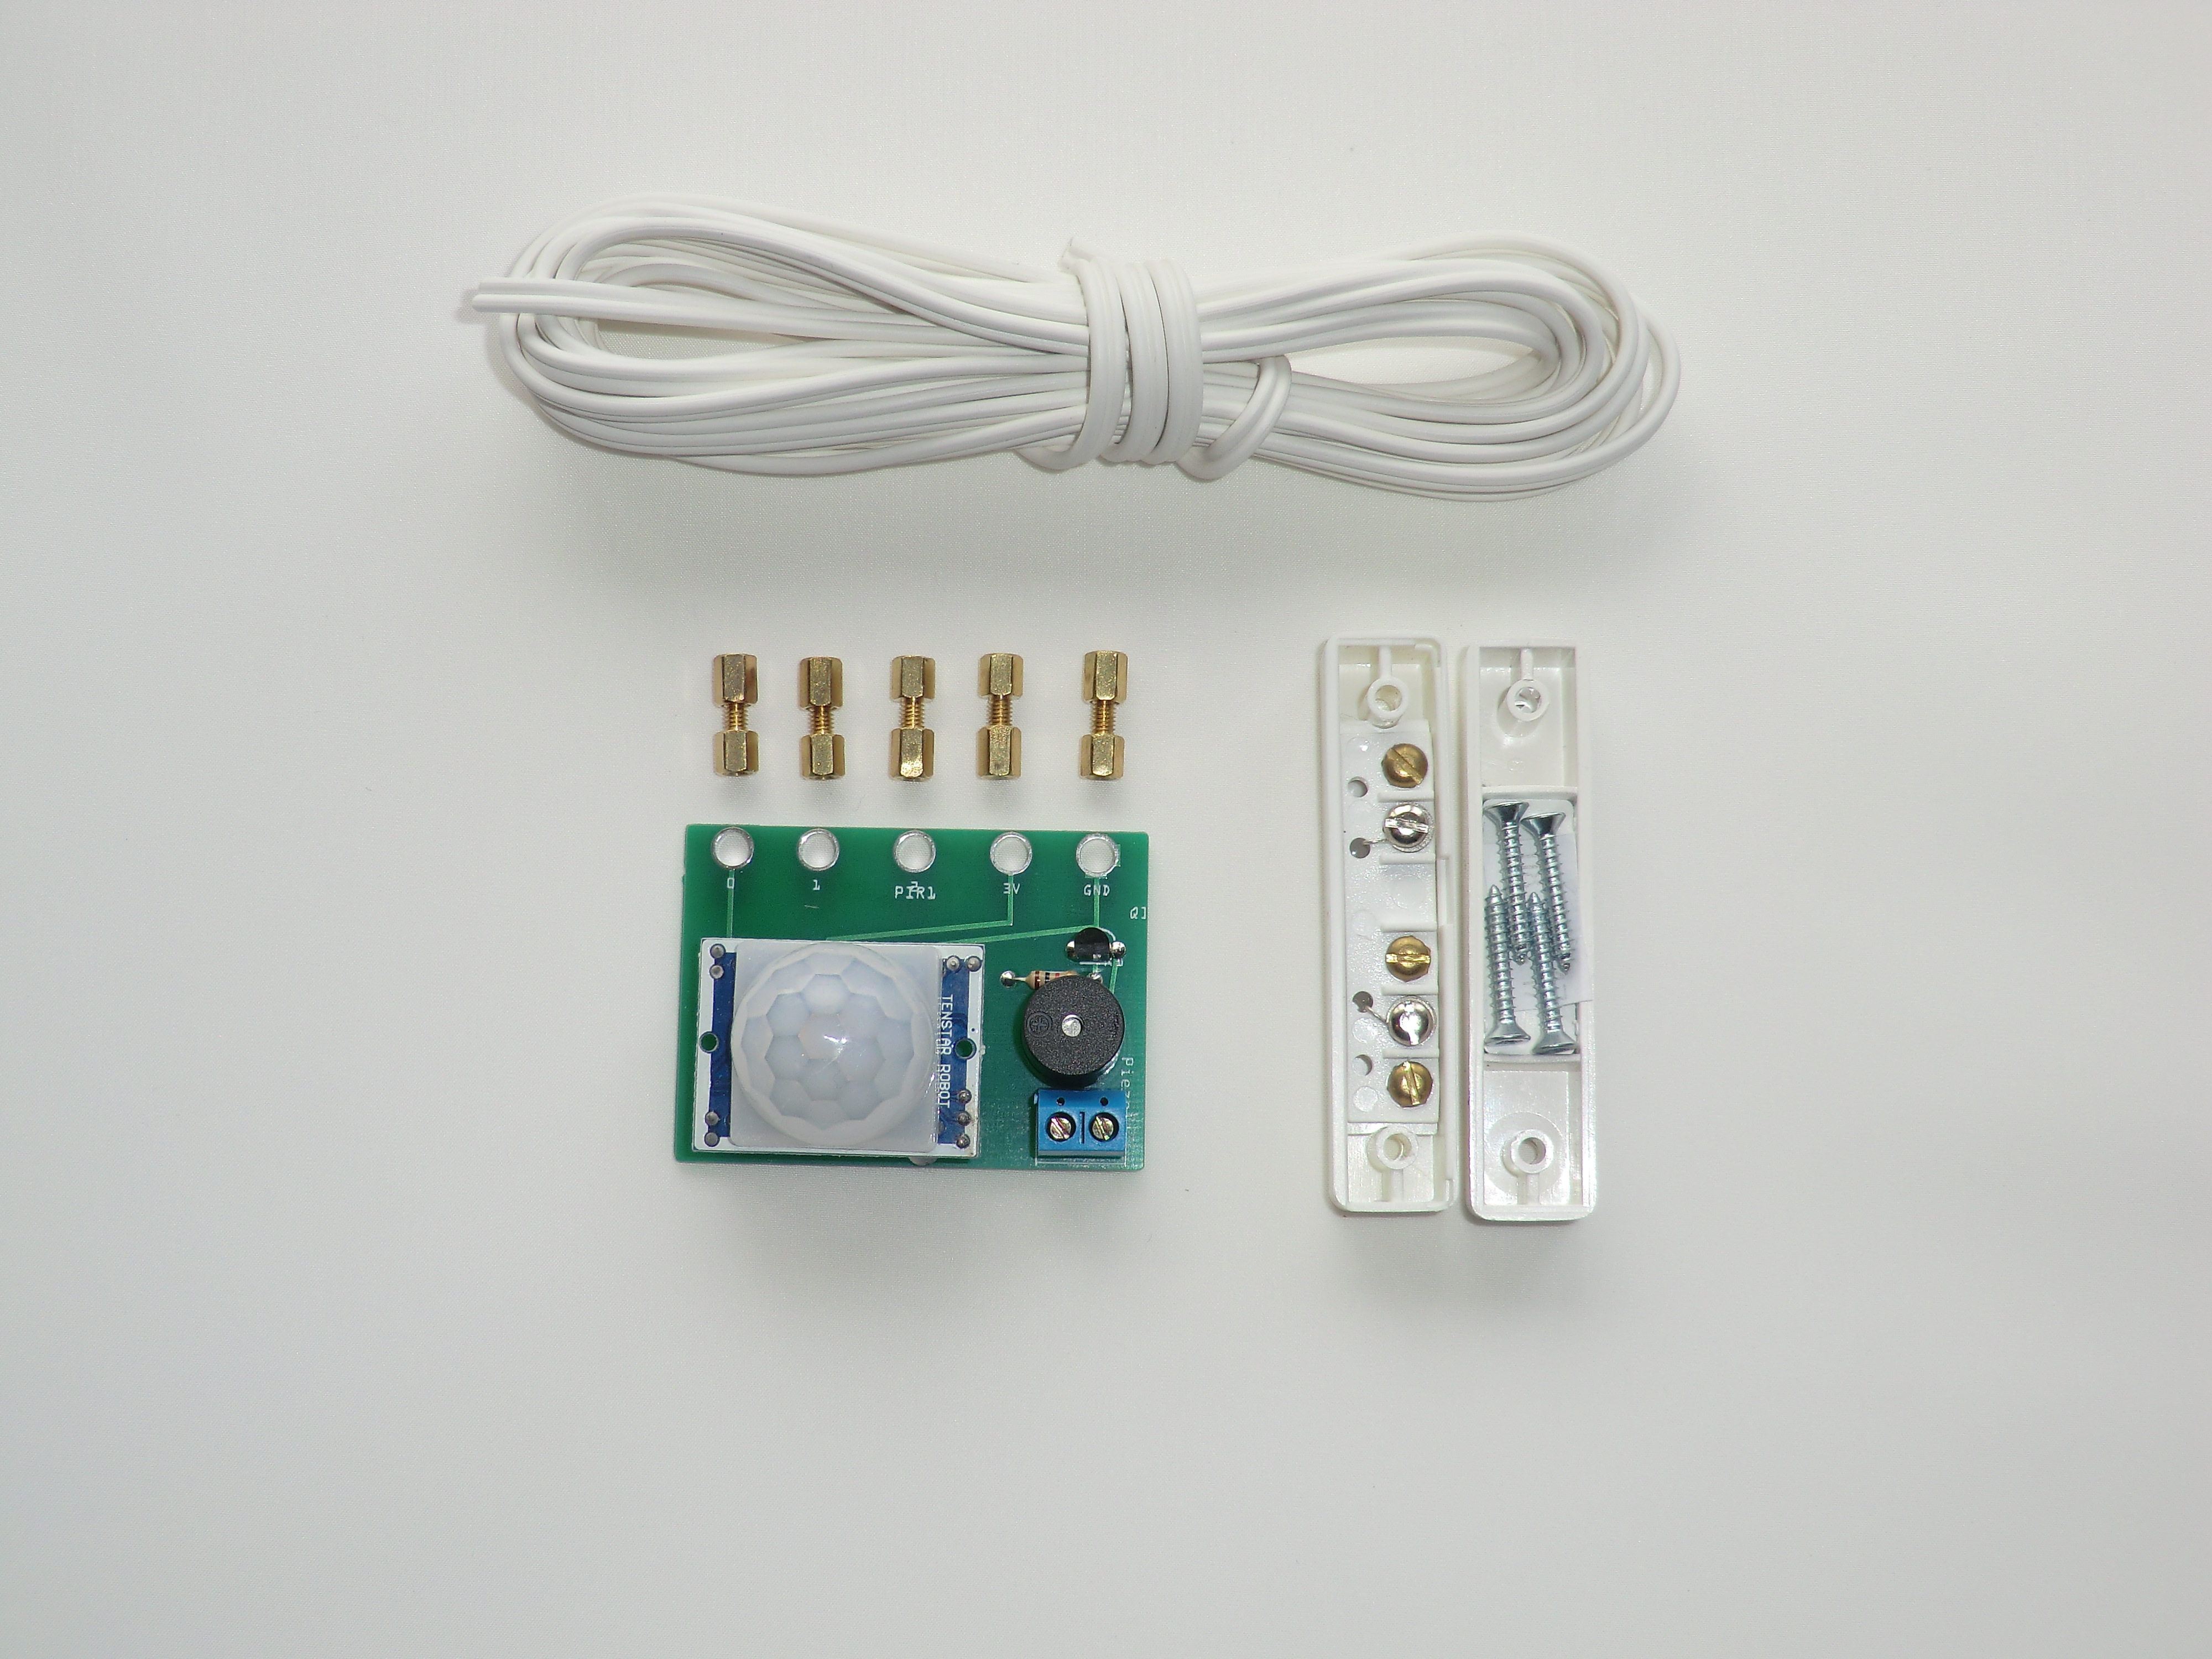
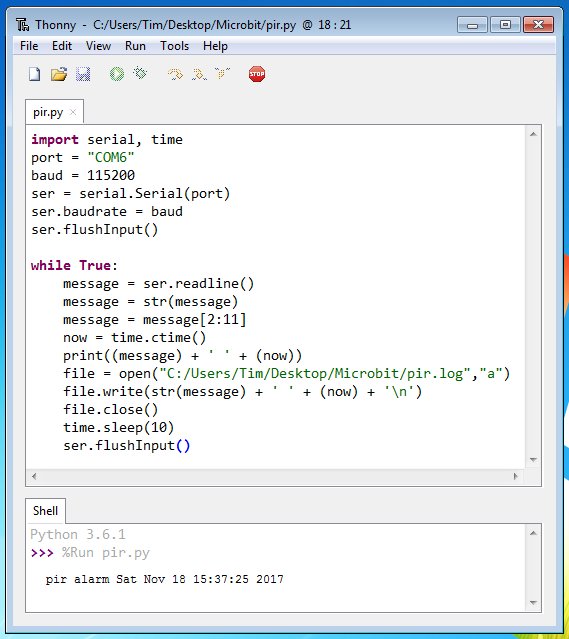
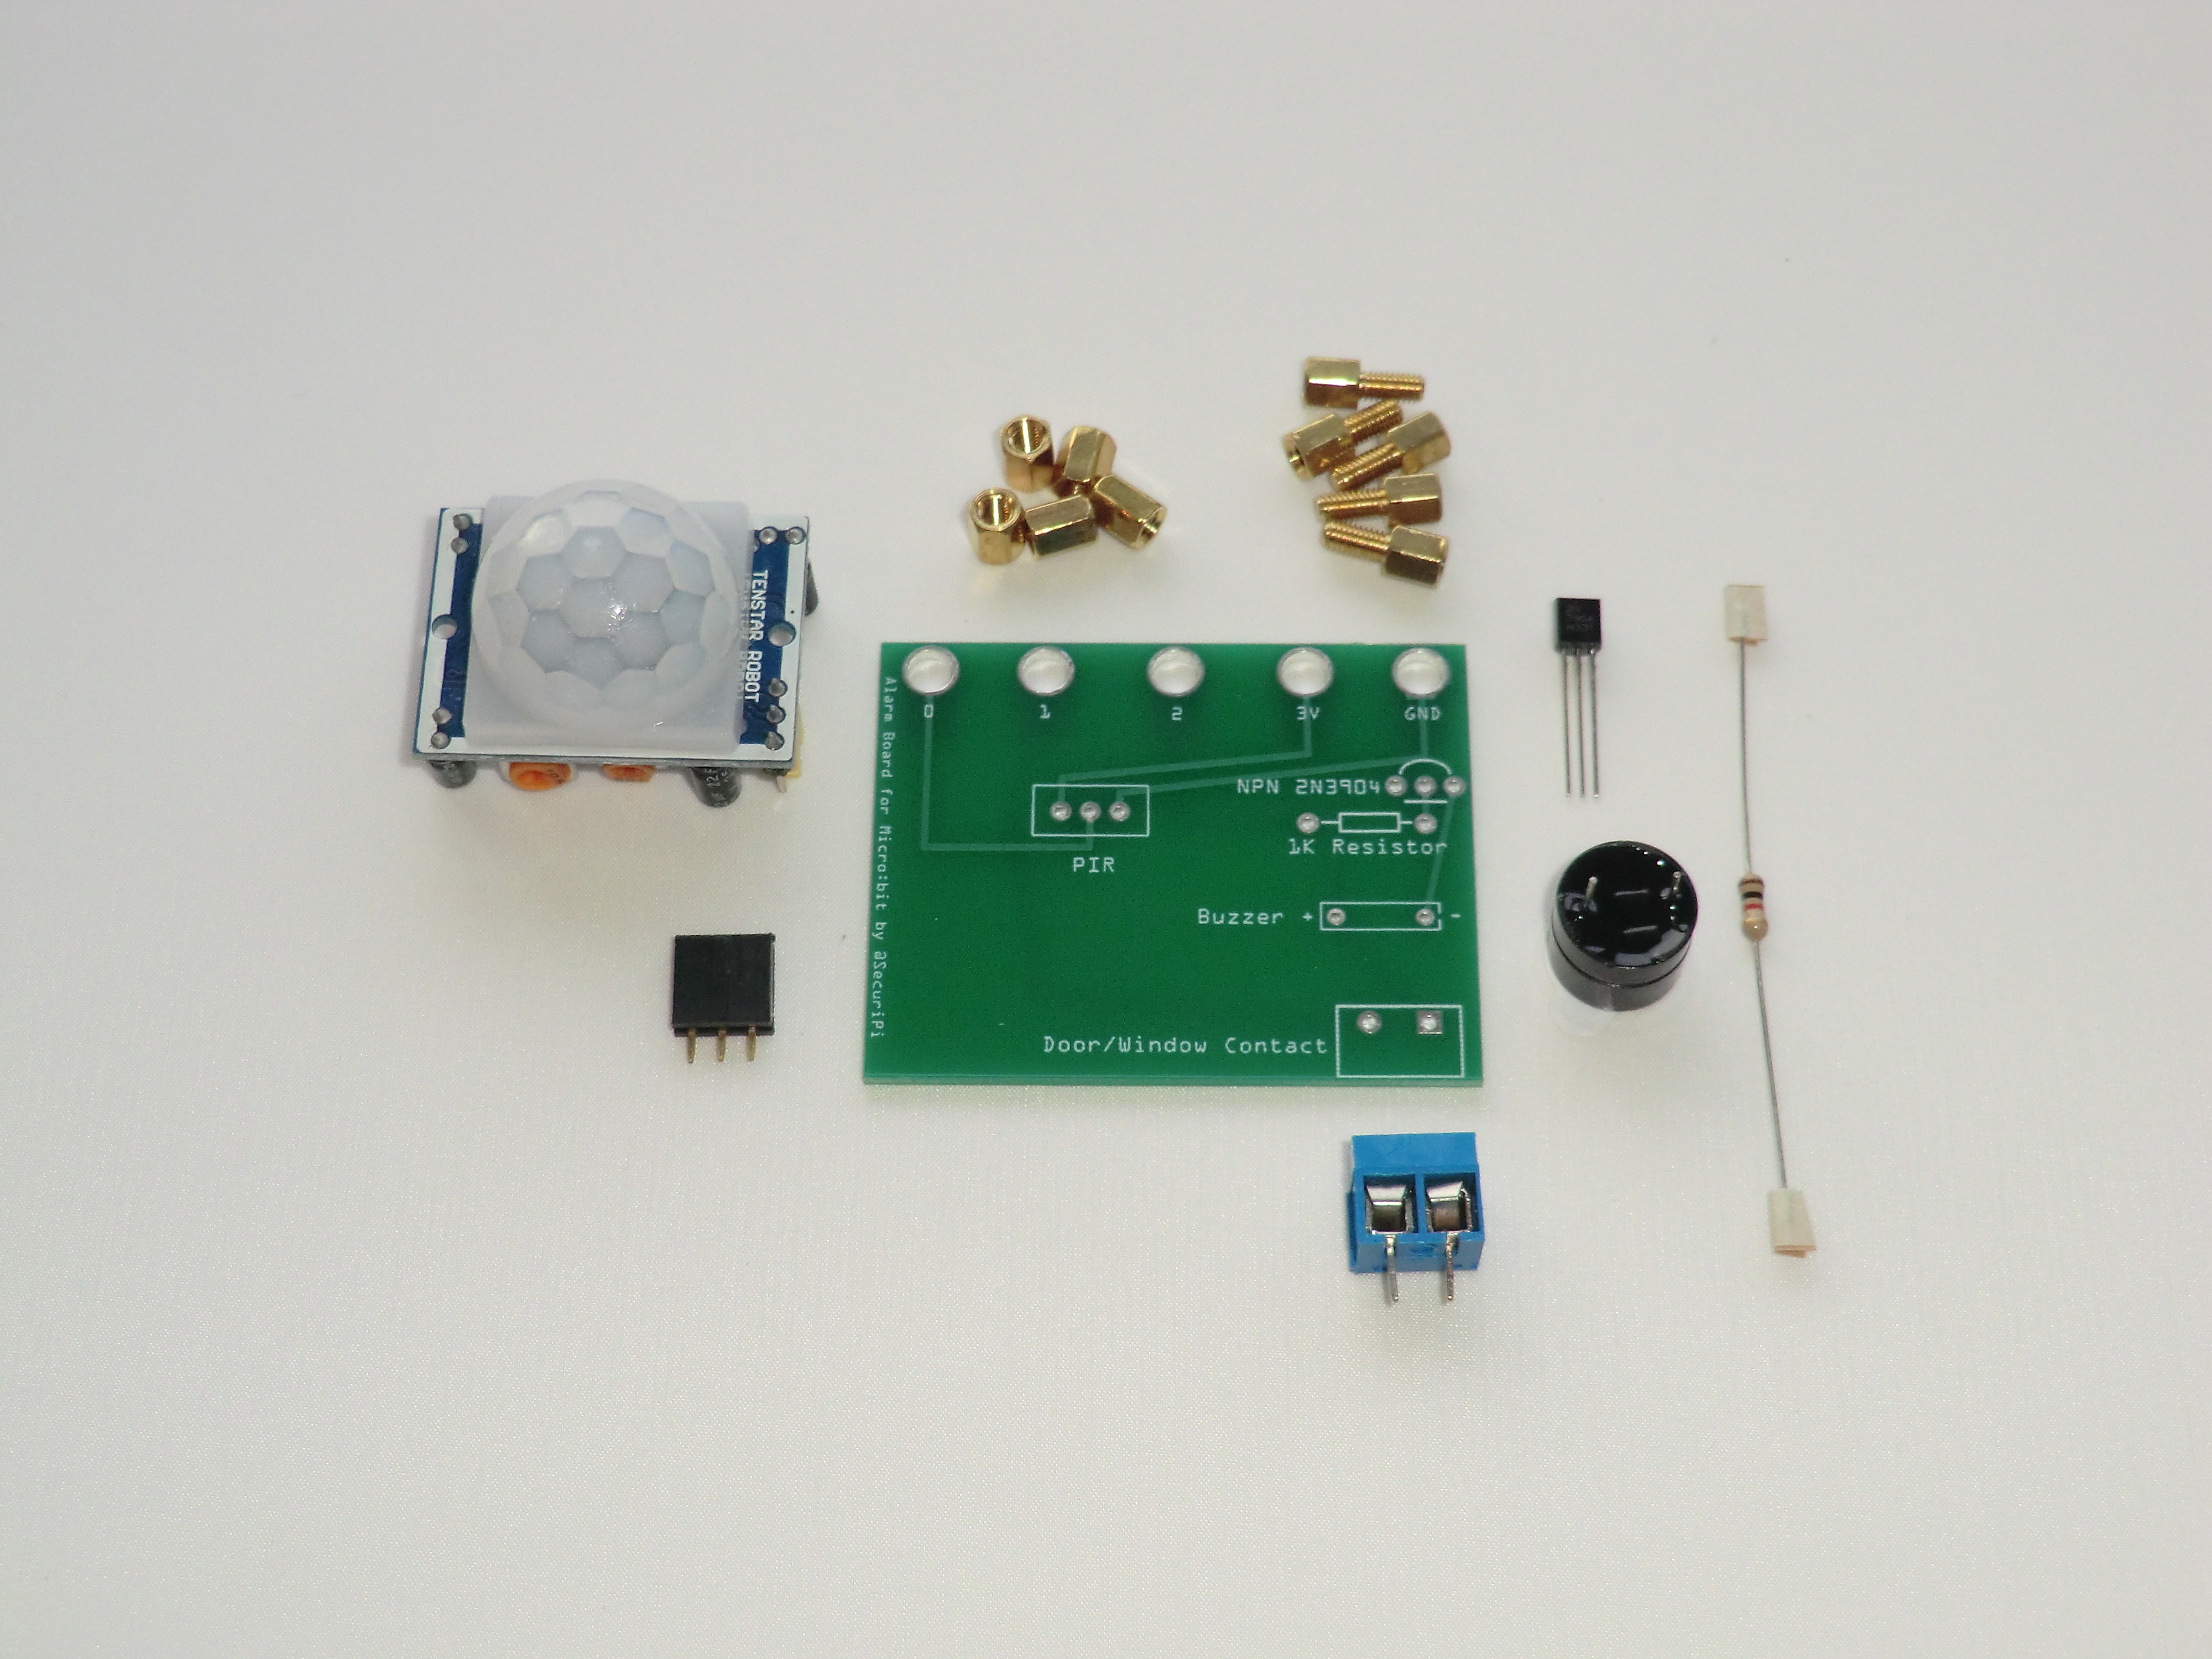
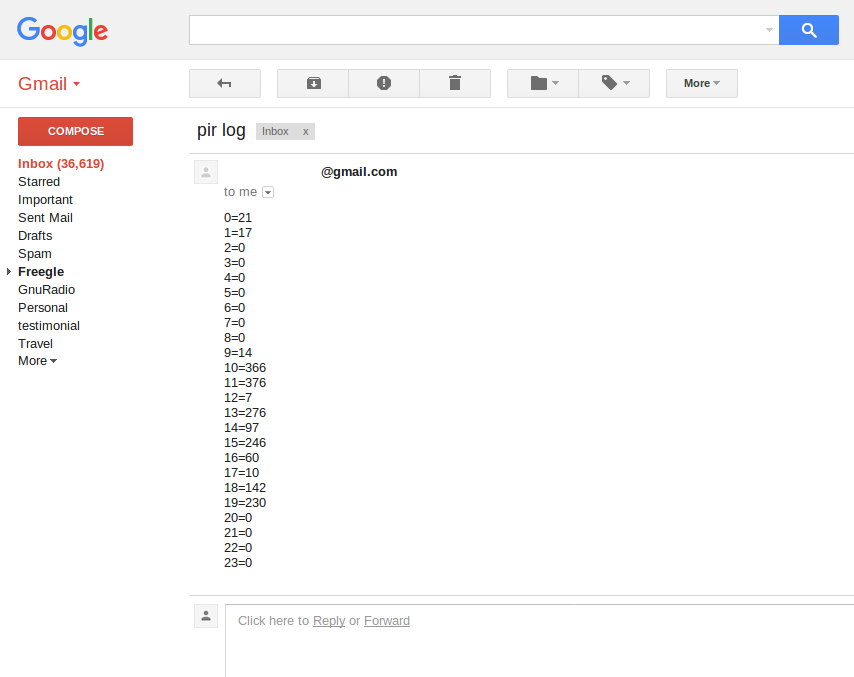
alarmbit.pdf – Manual for our Alarmbit board for BBC Microbit. Attach a PIR and magnetic door sensor to your BBC Microbit, and sound the onboard buzzer when alarm is triggered. Also includes guide for attaching Microbit to PC (using Thonny/Python) and sending alerts via email to your mobile phone. Also includes instructions for making a wireloop game using the Alarmbit board. Buy an Alarmbit board kit with PIR and magnetic door sensors at Amazon UK for £13.99 or Amazon US for $17.95. The Alarmbit PCB design files for Fritzing are here – useful if you want to make your own Microbit breakout PCBs.

OpenCV.pdf – Guide to using OpenCV image processing library on the Raspberry Pi. Get emails sent to your phone when intruders are detected on your CCTV. Count passing cars. Learn how to use OpenCV 3 and Python 3 together. You can buy the composite video to USB adapter used at Amazon UK or Amazon US,  and there’s a manual for the USB adapter at vid2pi.pdf

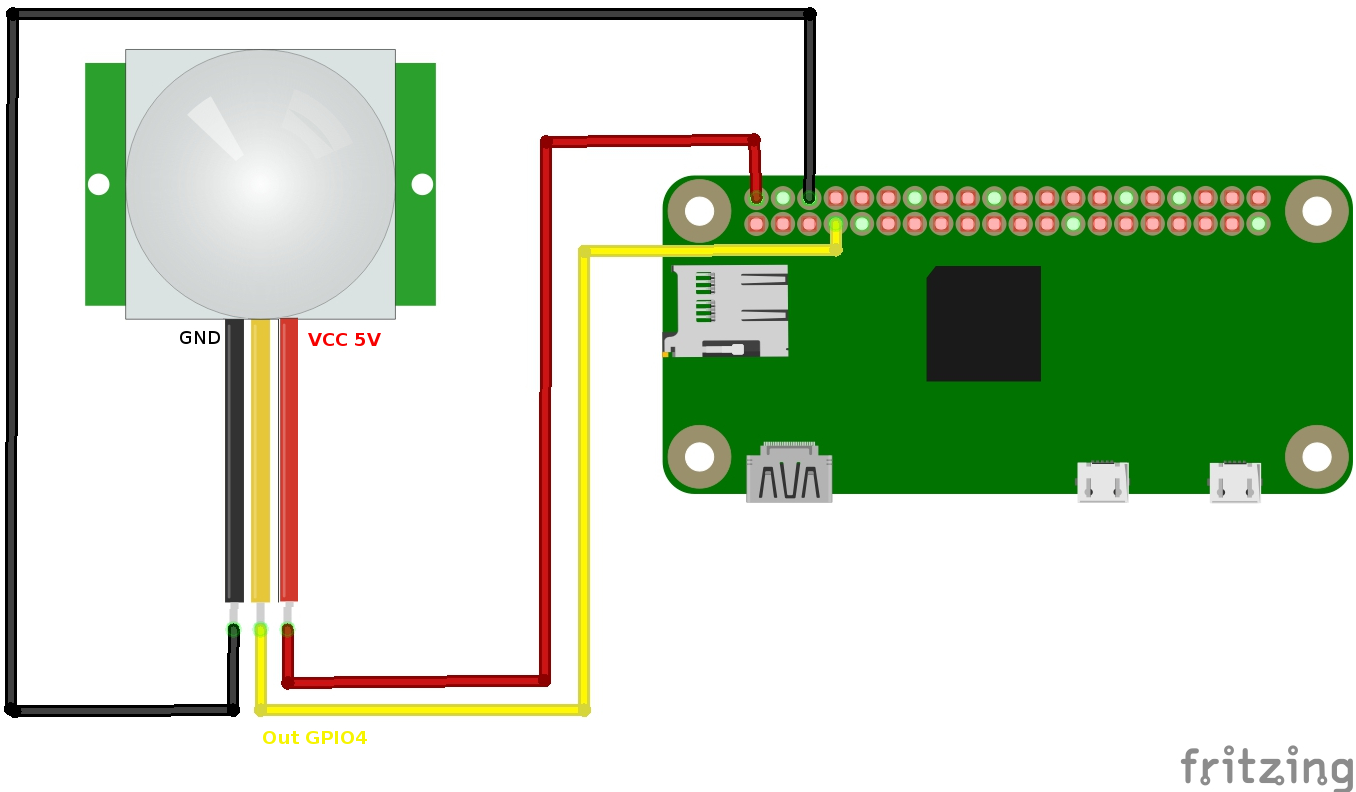
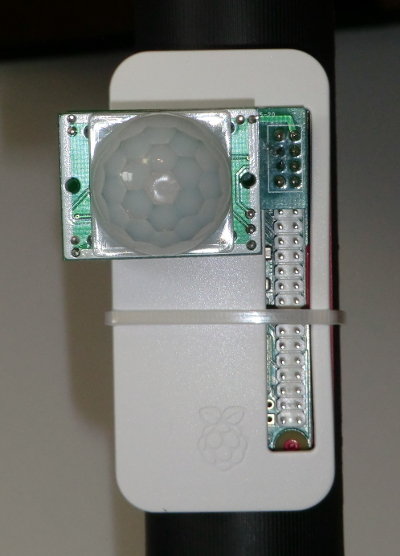
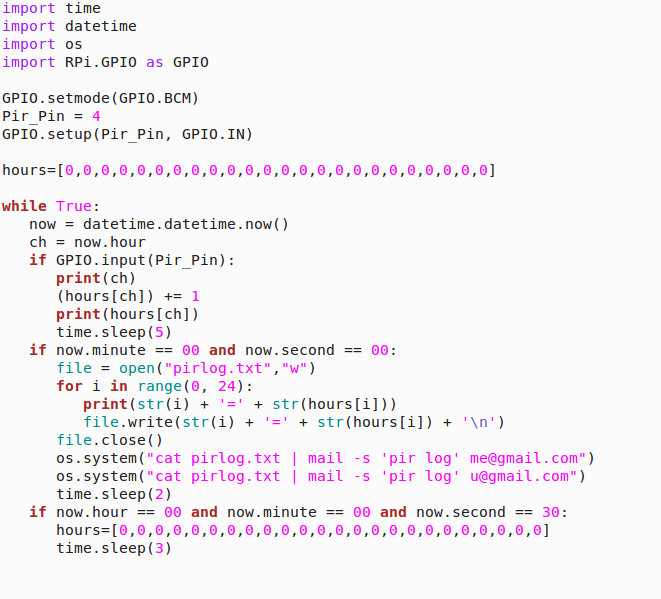
sg.pdf – Senior Guardian project – keep an eye on an elderly relative in a less intrusive way, using a Raspberry Pi and a PIR module. It keeps track on how many times an hour the PIR gets triggered and sends emails to your phone with those statistics. Python code examples included.

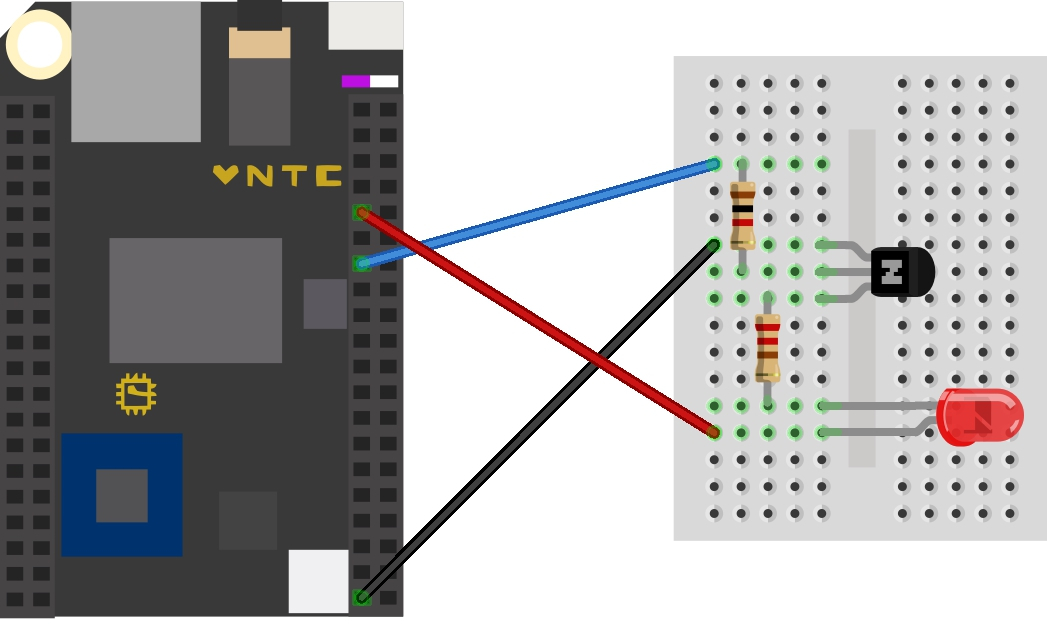
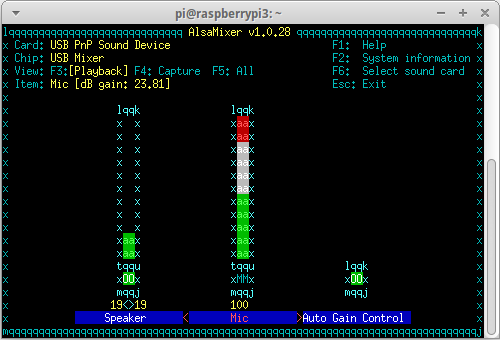
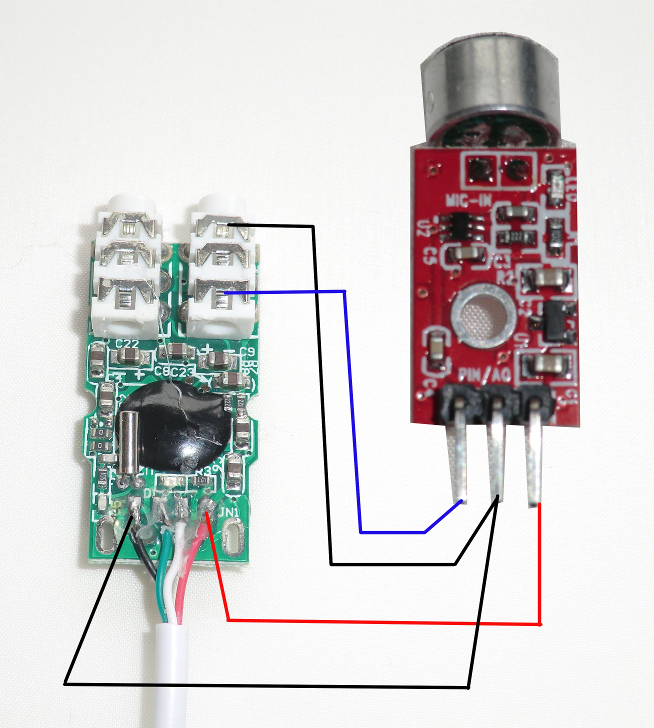
vr.pdf – Voice recognition on a Raspberry Pi using a homemade USB room mic. Display stock prices and news. Turn an LED on and off. All using voice commands. Python code.

vrchip.pdf – Voice recognition on a NextThingCo C.H.I.P computer board using a room mic. Display stock prices and news. Turn an LED on and off. All using voice commands. Python code.

And some older PDFs from our archive: https://www.securipi.co.uk/

4chan.pdf – receive signals from a 4 button 433MHz remote control on your Pi.

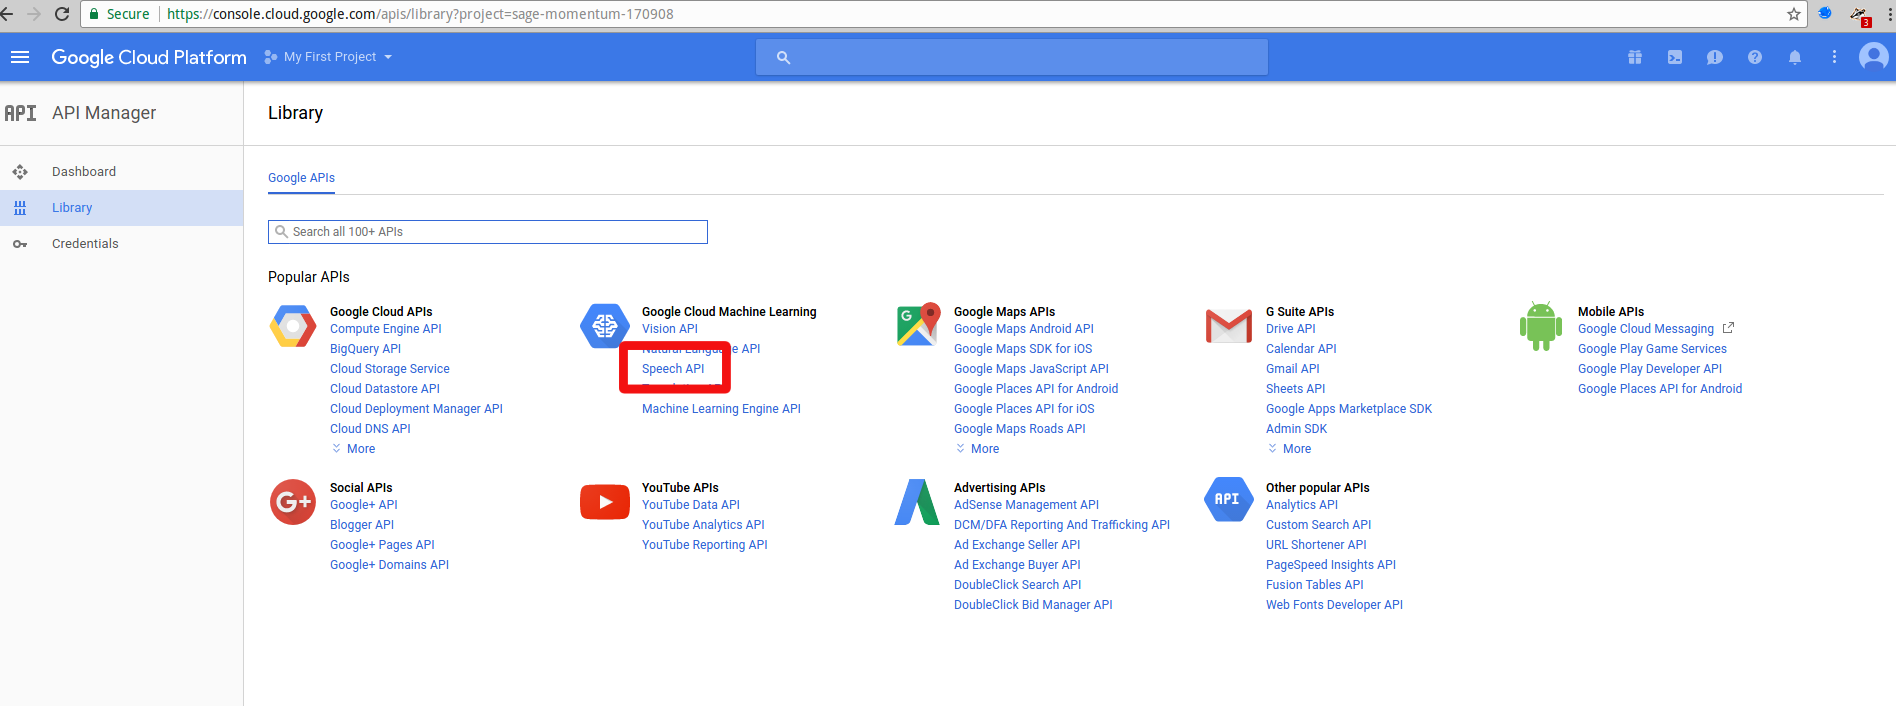
audiospy.pdf – A new kind of audio bug using a Raspberry Pi. Records audio from a USB room mic, transcribes it to text using Google speech to text engine. Sends what it heard as a text message to remote phone’s email account.

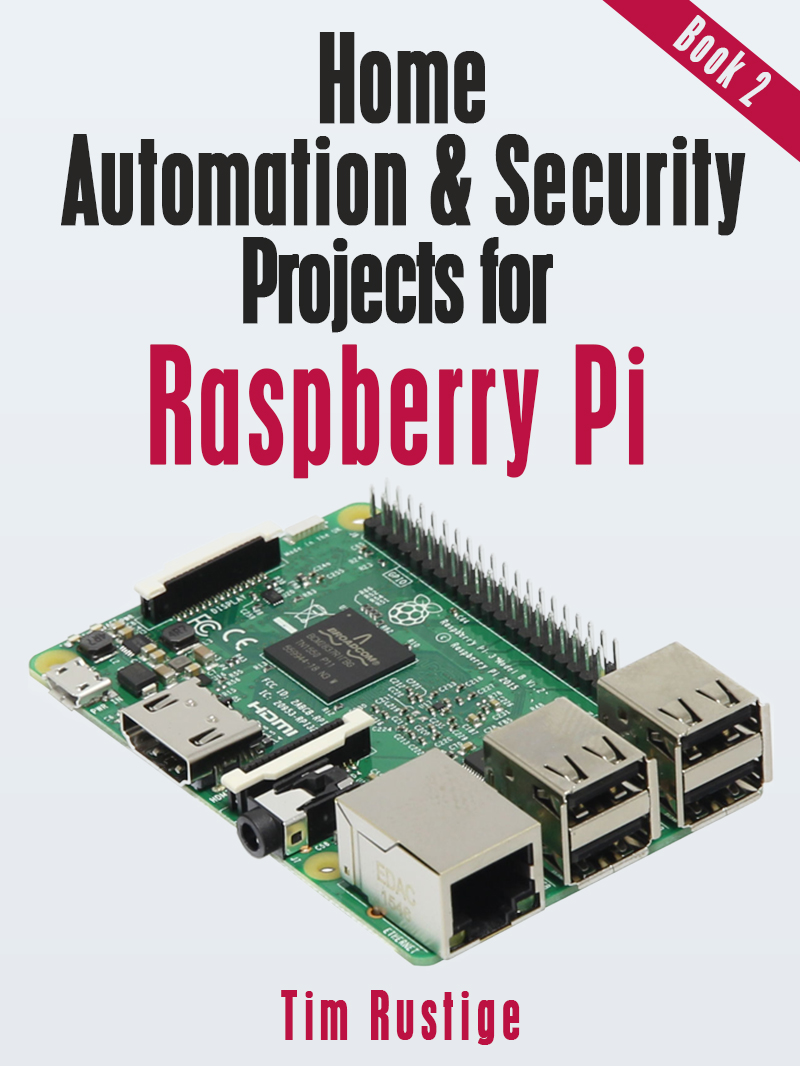
book2intro.pdf – First few pages from our 2nd Home Security Projects book for Raspberry Pi.  Full book PDF for instant download here or printed Amazon paperback here

cbdb.pdf – Connect a Codebug to a Raspberry Pi, shows visual alert when our Doorbell Kit for Raspberry Pi is triggered

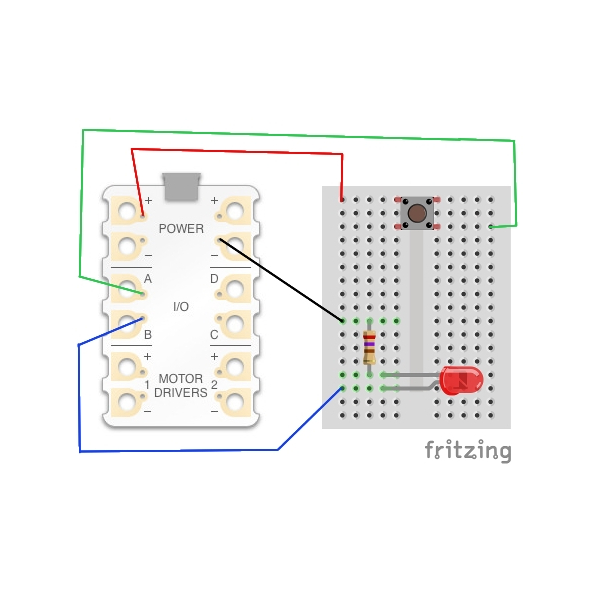
ekit.pdf – Manual for our electronics kit for Raspberry Pi. Examples in BASH, Python and Scratch.

em1.pdf – How to connect an electromagnet to your Raspberry Pi.

keypad.pdf – use a 12 digit entry keypad with a Raspberry Pi to make a PIR alarm that sends a photo of intruder to your mobile phone. Python 3 examples. Same thing but with the cheap self-adhesive keypads here: https://securipi.co.uk/keypadkit.pdf

mcp23008-and-microbit.pdf – make an 8 LED Knight Rider style LED array using a BBC Microbit.

pibrella.pdf – some BASH shell scripts for use with Pibrella board.

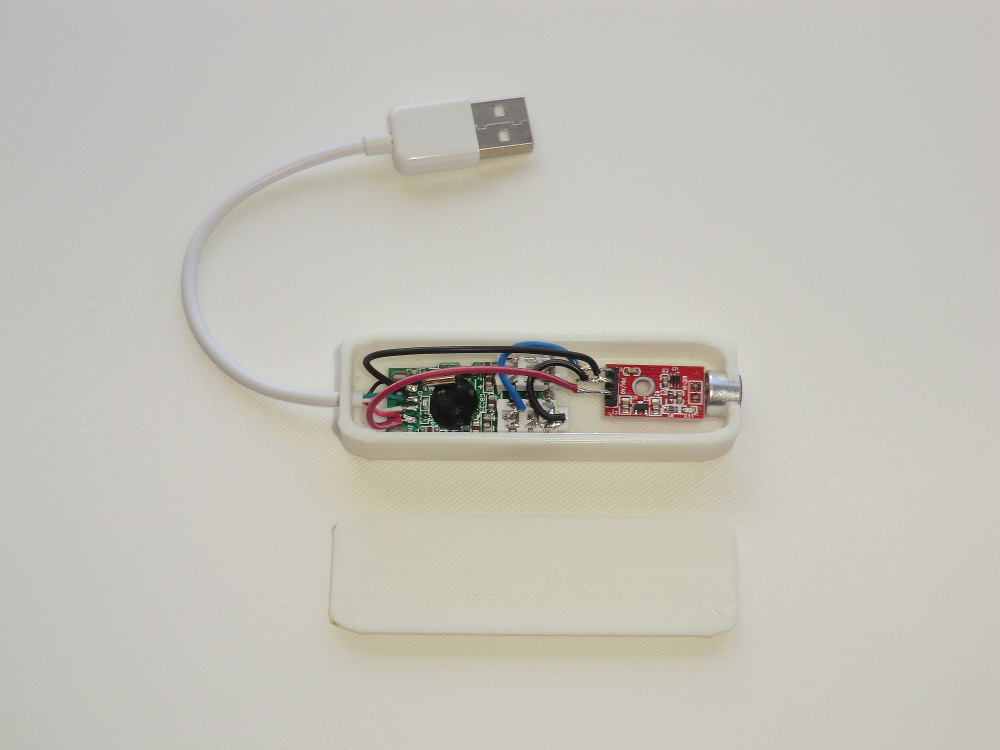
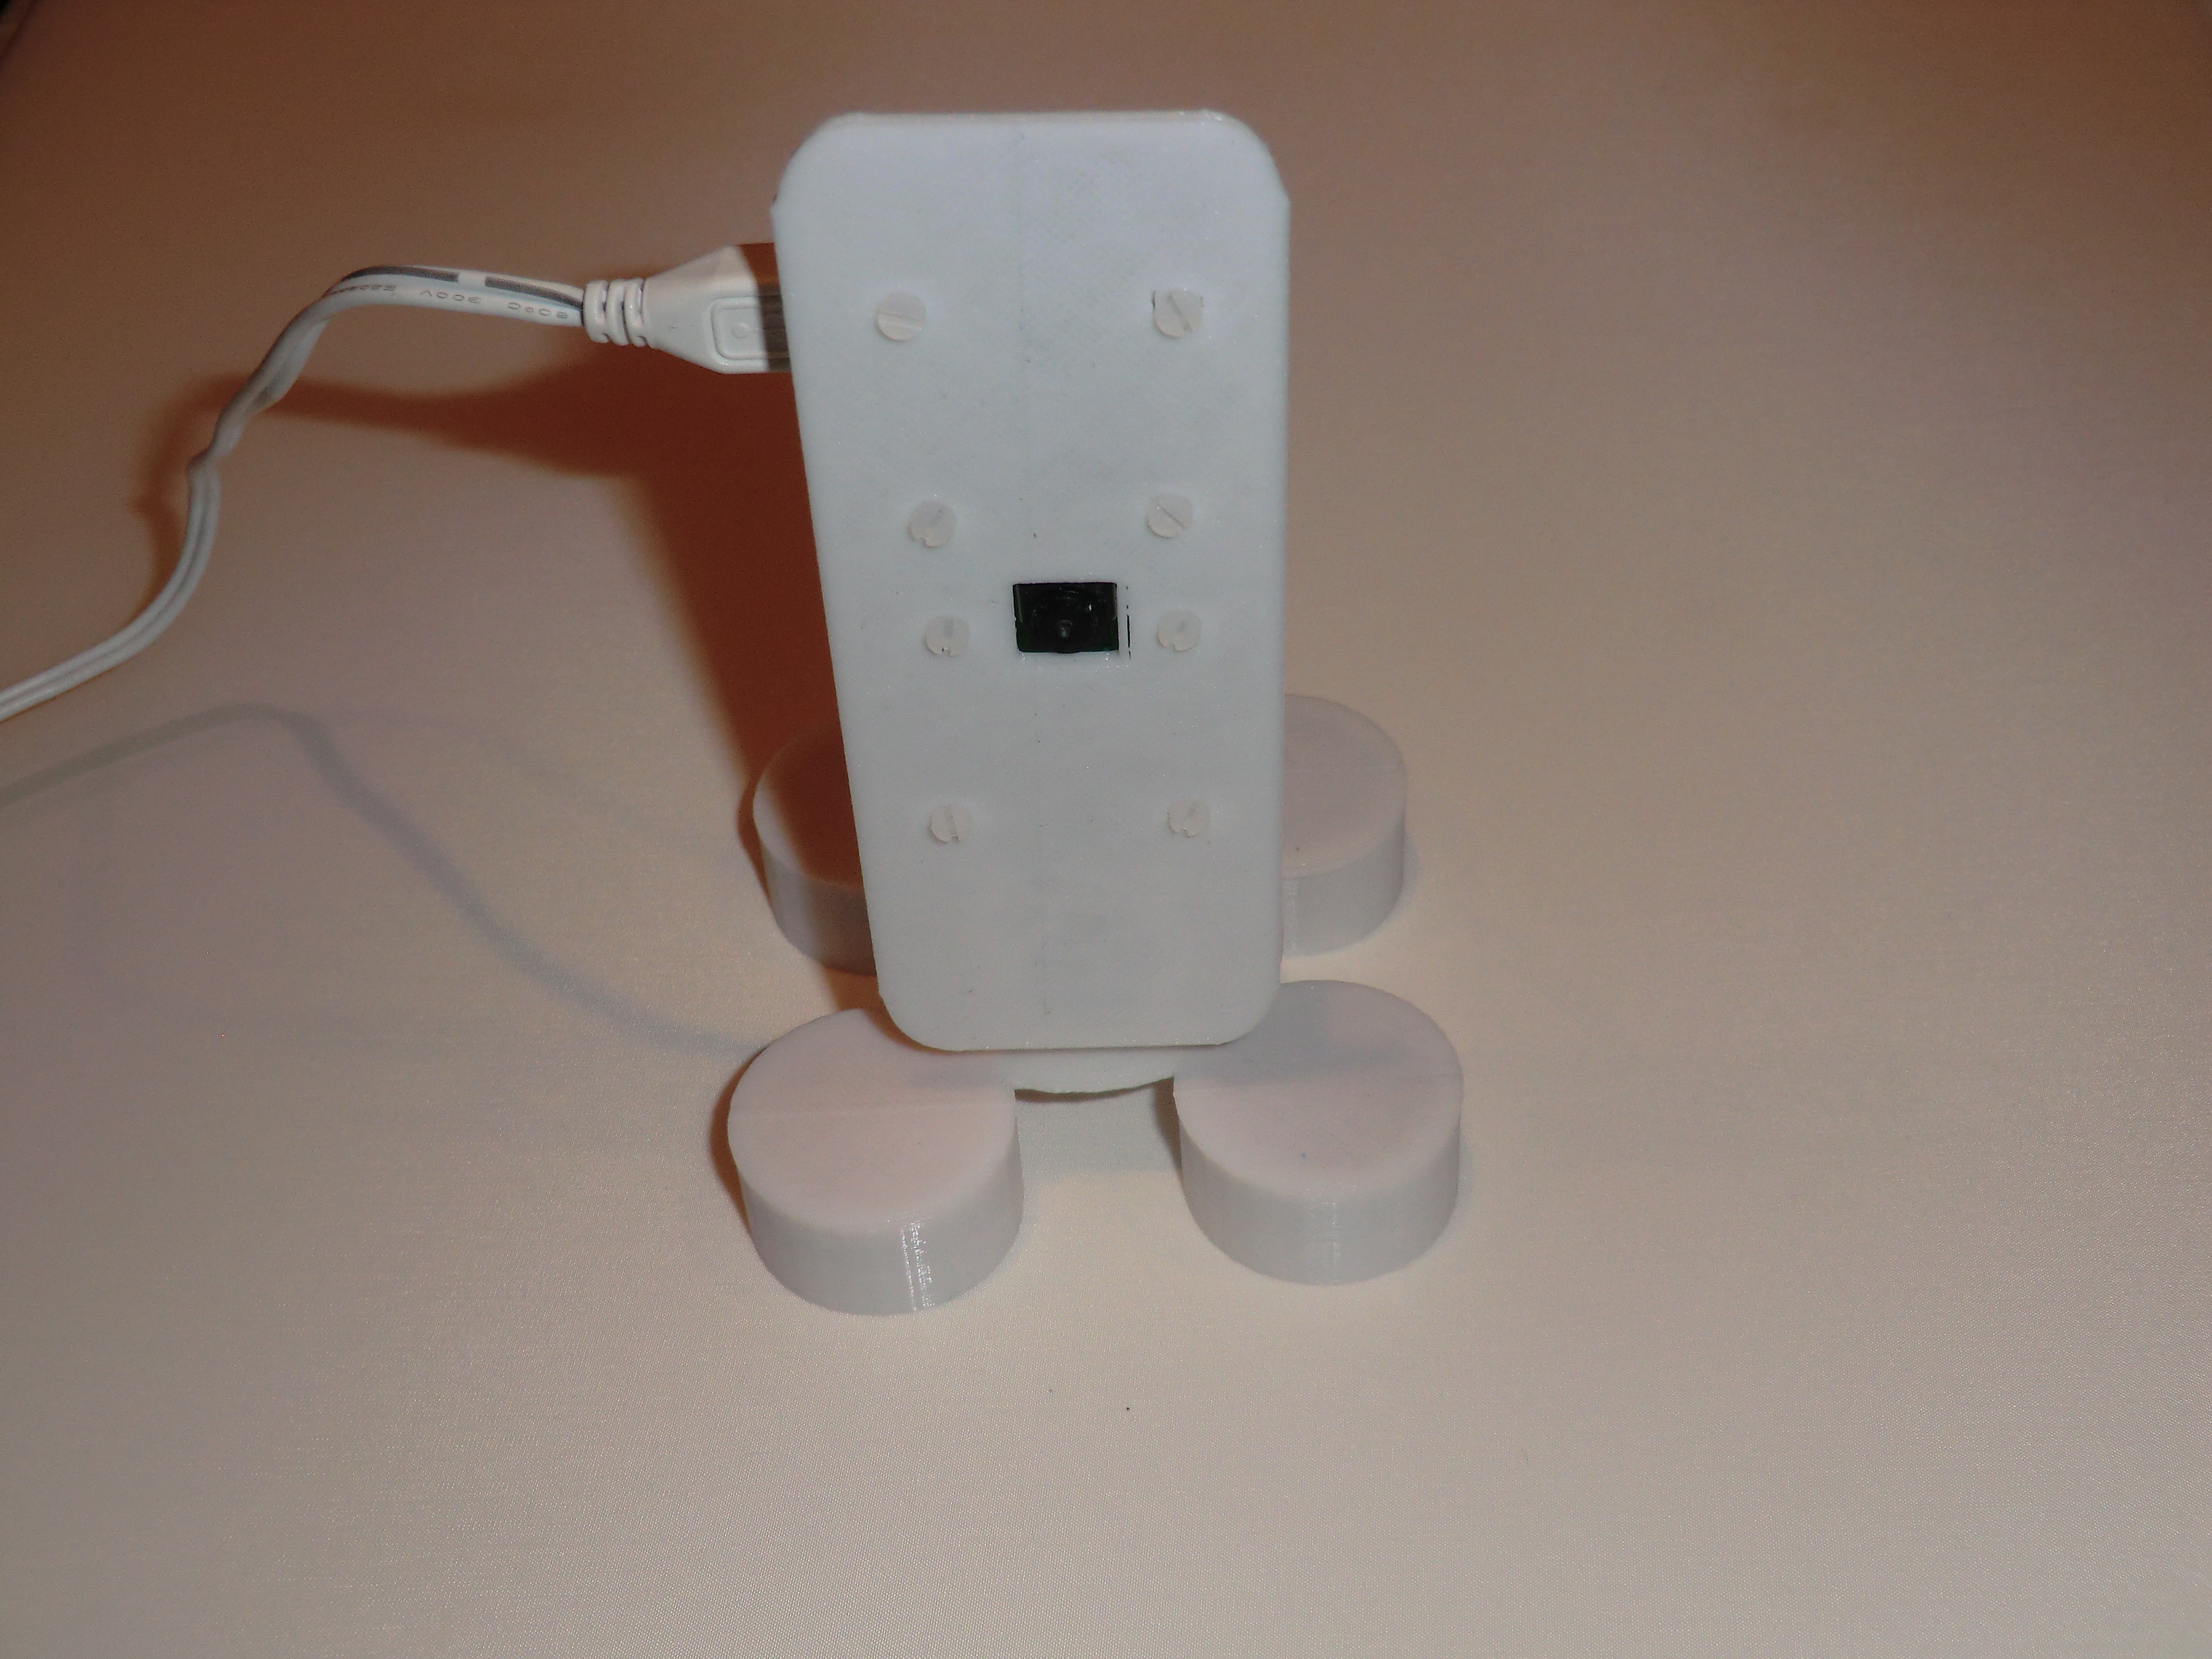
PocketPi.pdf – make a pocket sized Raspberry Pi with rechargeable battery and Pi Zero.

pi-audio-streaming.pdf – Stream audio between two Raspberry Pi units from an external microhone.

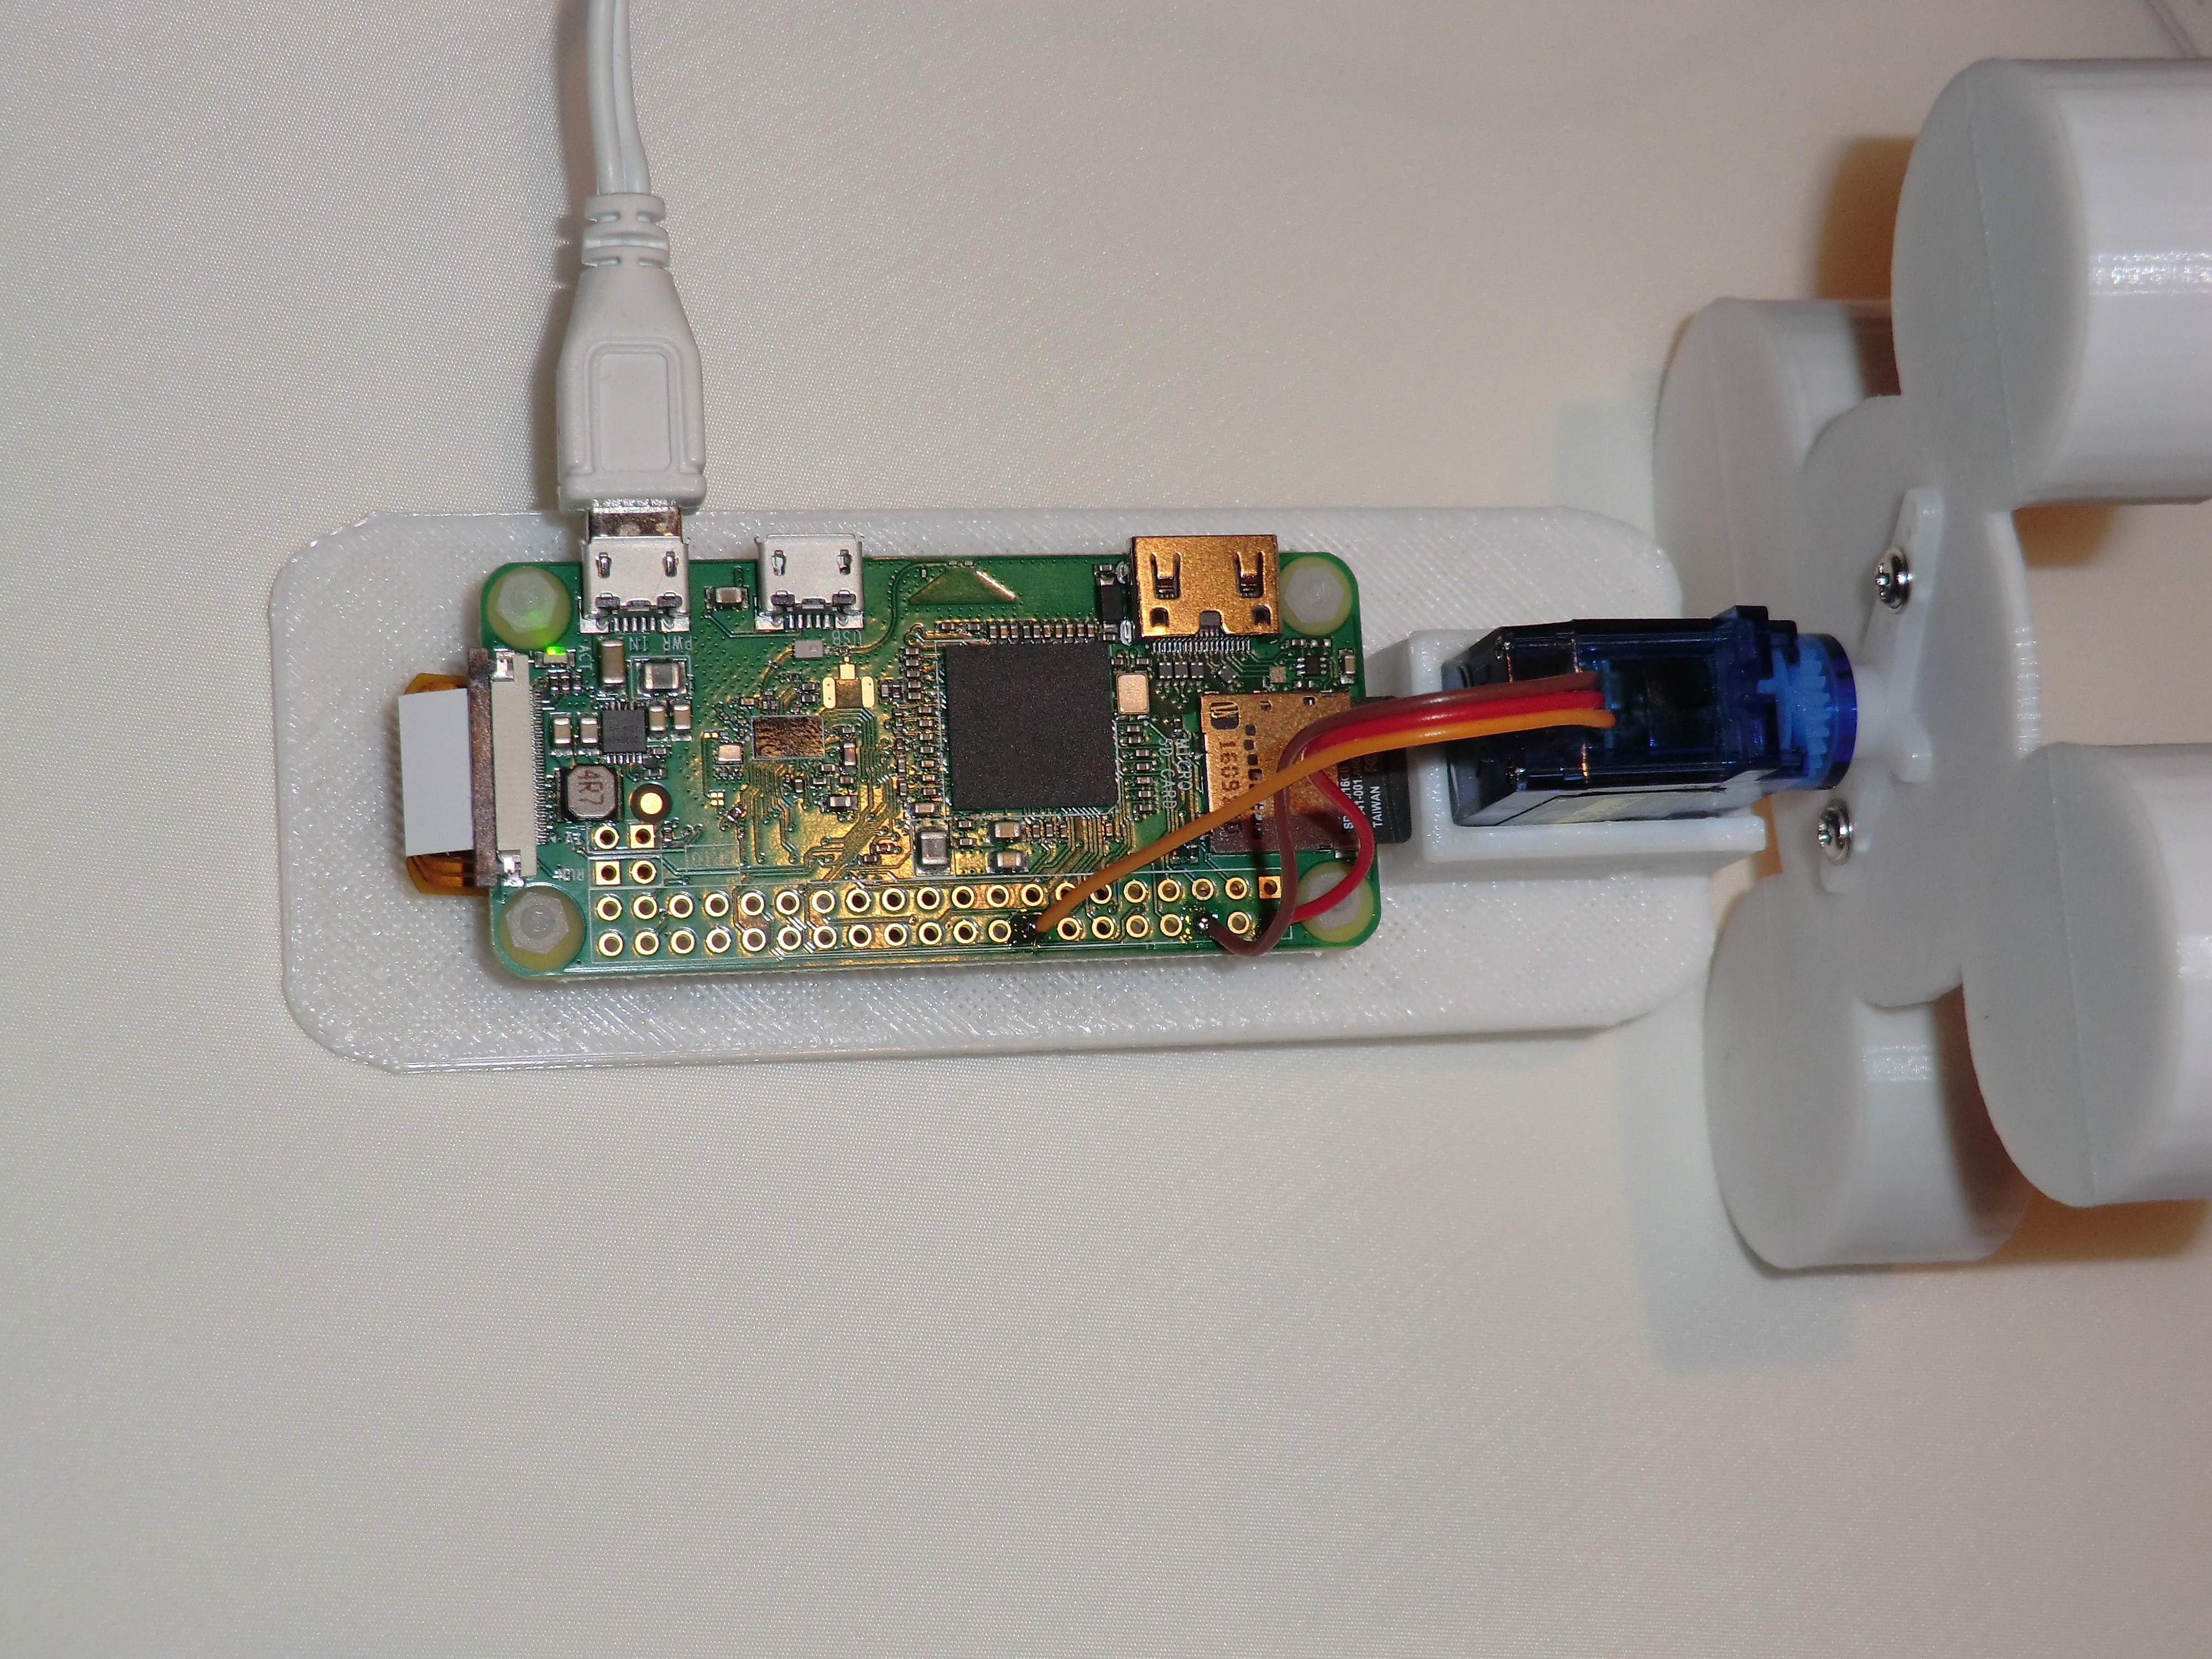
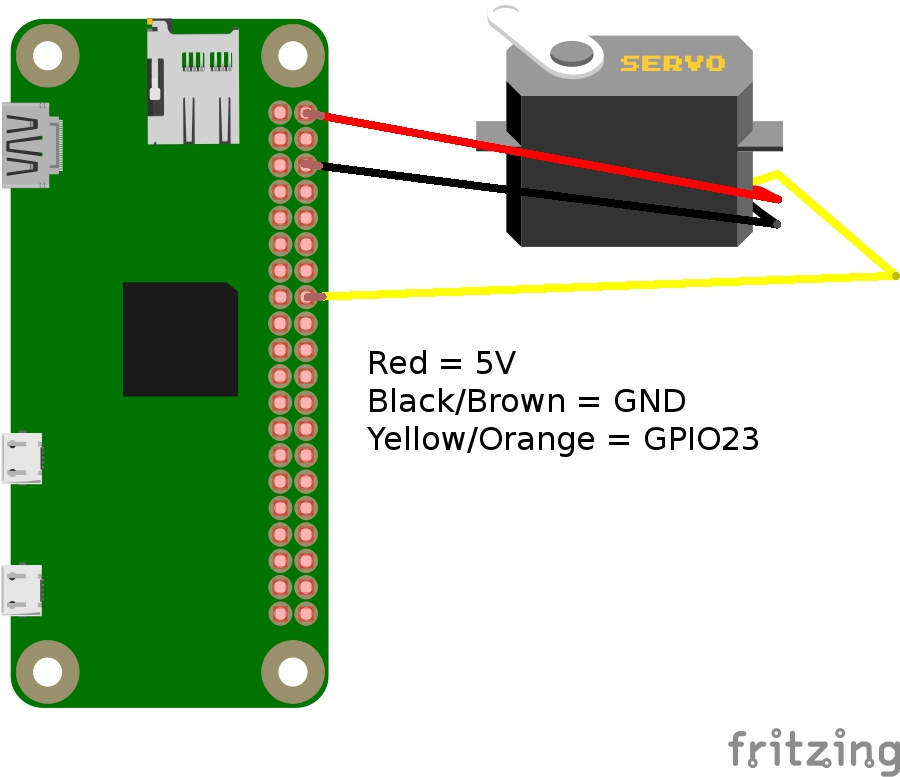
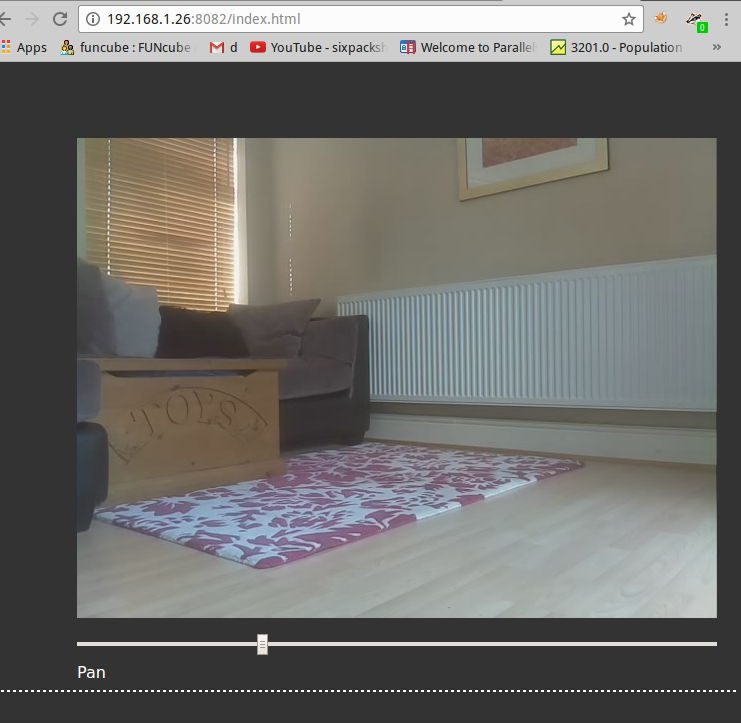
servo.pdf – Connect a Pan/Tilt camera bracket to your Raspberry Pi.

smoke.pdf – connect a smoke alarm to your Raspberry Pi.

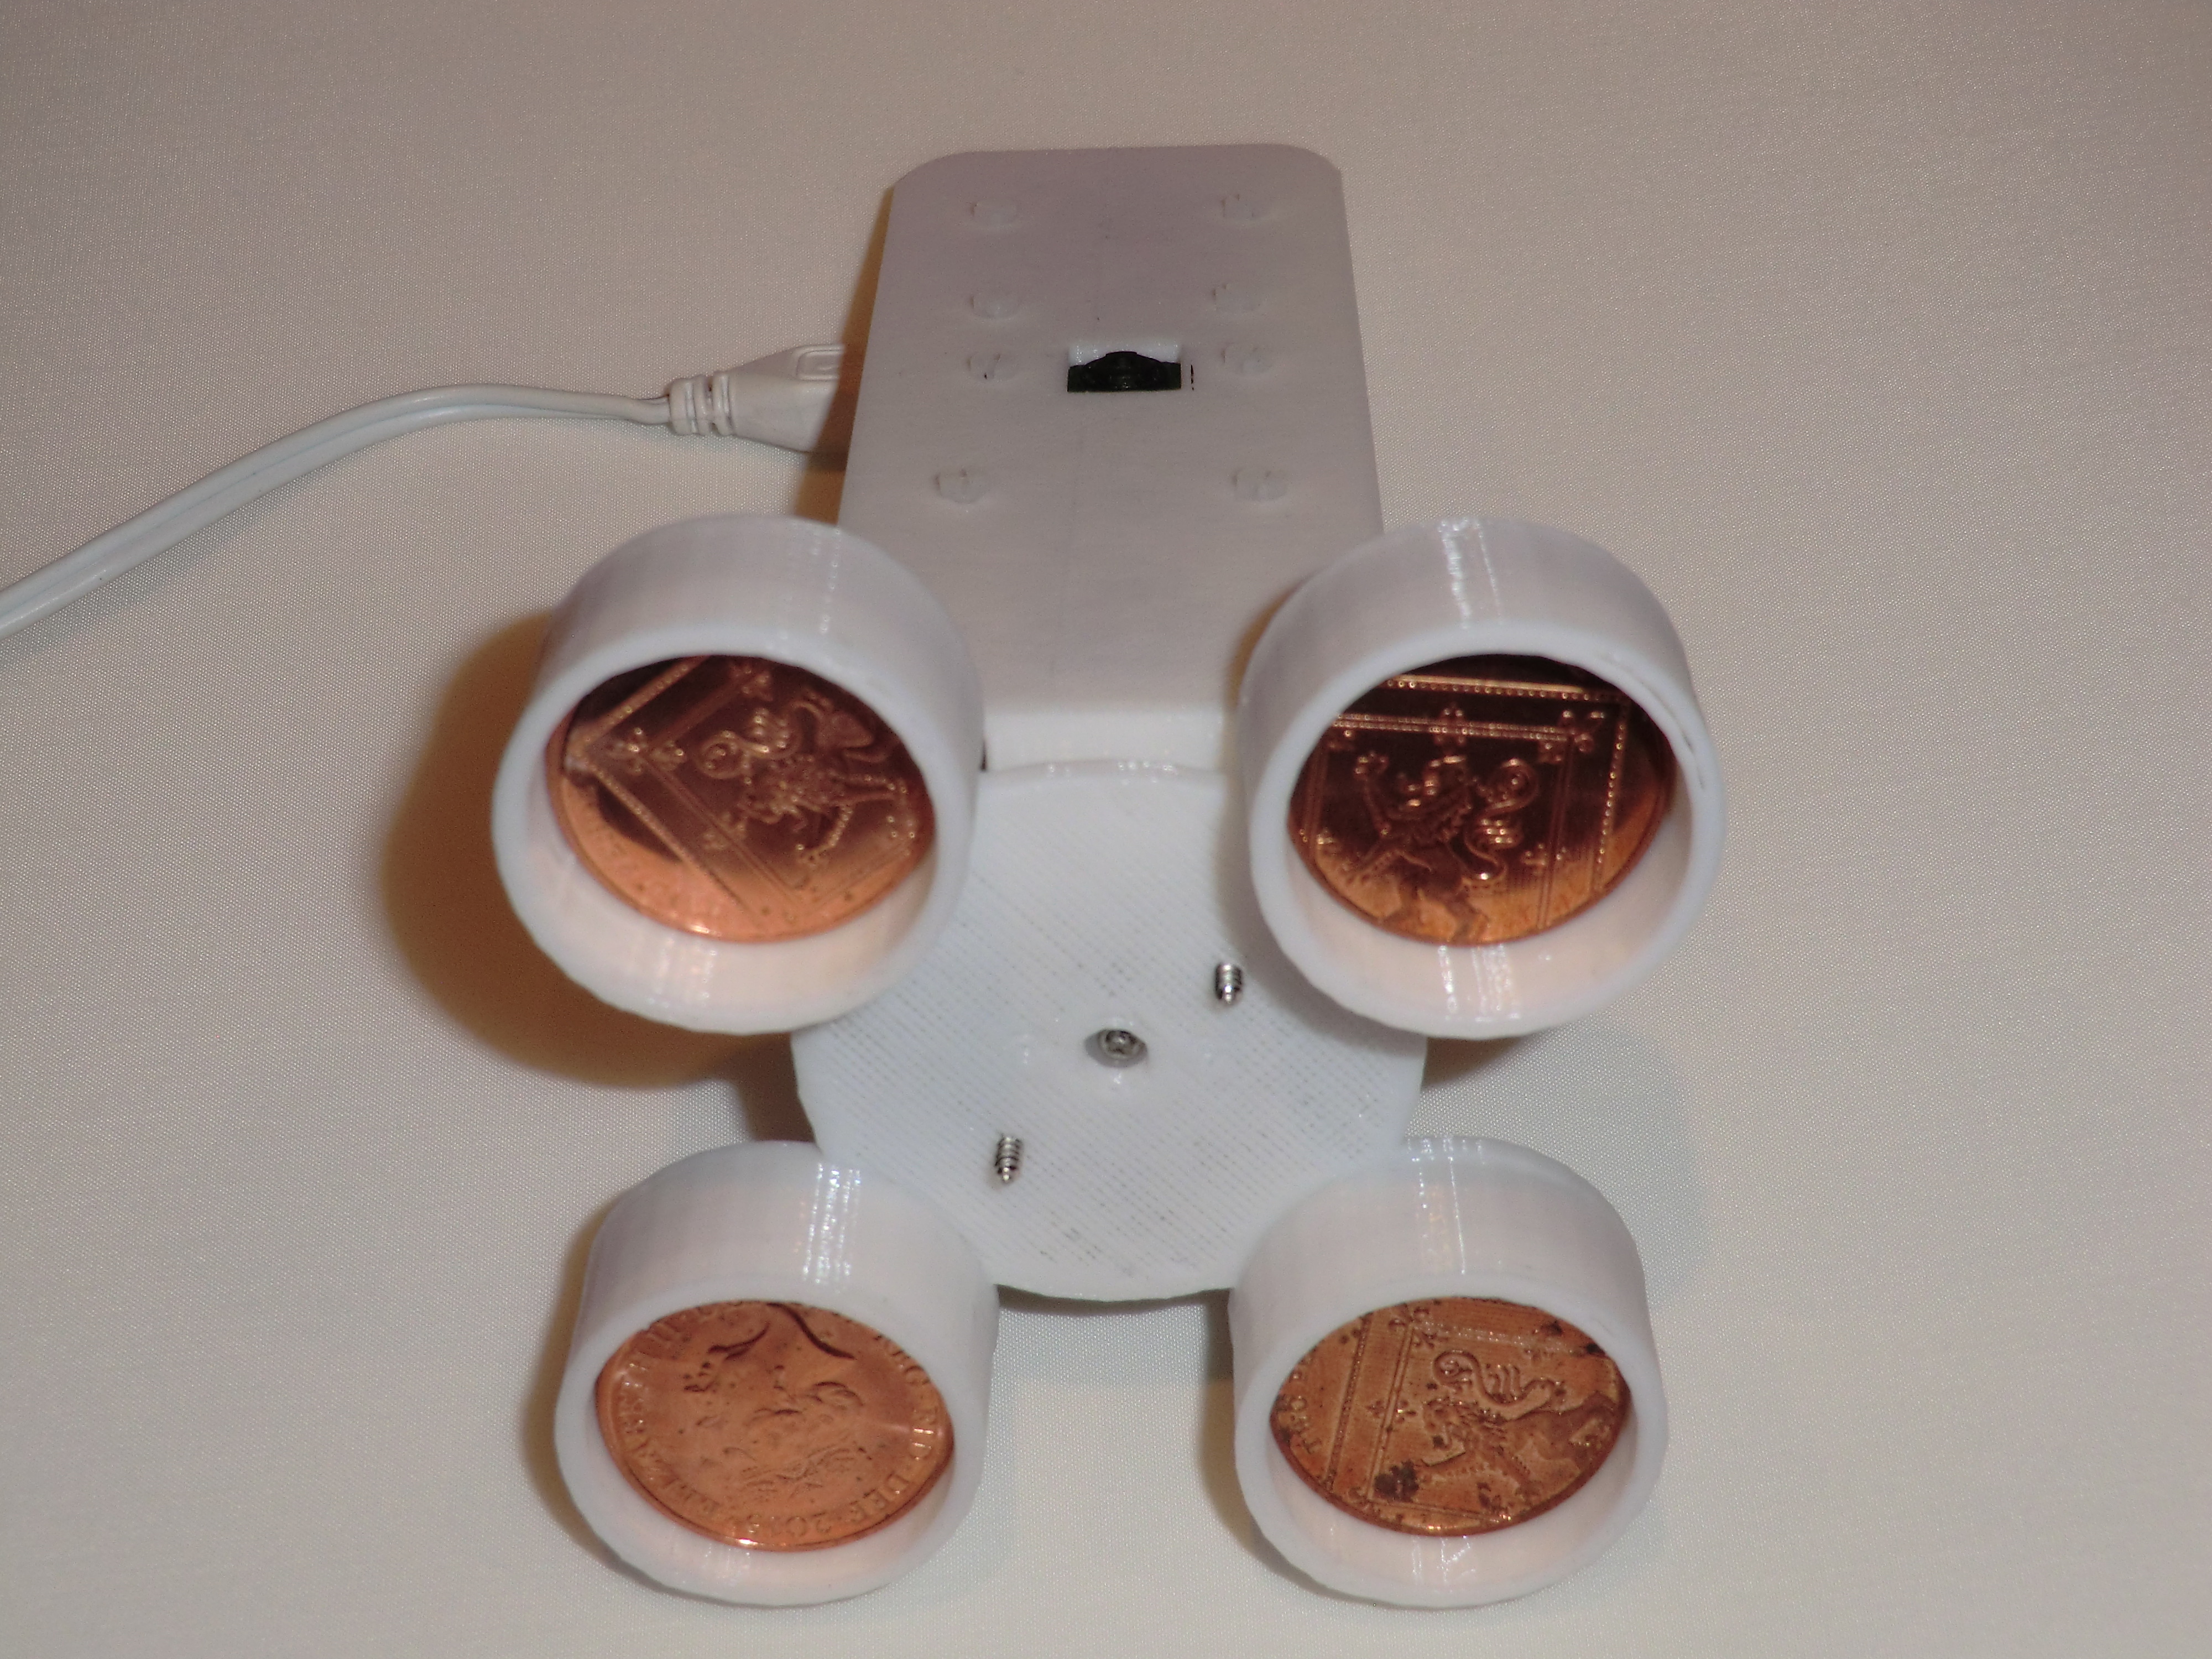
tiddly.pdf – Some BASH shell scripts to control the TiddlyBot mini robot car.

wifisniff.pdf – How to sniff Bluetooth and WiFi MAC addresses nearby – originally written for older Raspberry Pi’s with external USB dongles.

Mastodon

 Posted by at 10:52 am

Use a Sparkfun COM-14662 12 digit 3*4 matrix keypad with a Raspberry Pi for PIR alarm system

 Raspberry Pi  Comments Off on Use a Sparkfun COM-14662 12 digit 3*4 matrix keypad with a Raspberry Pi for PIR alarm system
Jun 052018
 

Use a Sparkfun COM-14662 12 digit 3*4 matrix keypad with a Raspberry Pi for PIR alarm system

Download PDF version of this guide at http://www.securipi.co.uk/keypad.pdf

The keypad we used is a Sparkfun Electronics COM14662 which is available from Pimoroni in the UK for £3.50. Similar looking keypads are available on Aliexpress.com https://www.aliexpress.com/item/12-Key-Membrane-Switch-Keypad-4-x-3-Matrix-Array-Matrix-keyboard-membrane-switch-keypad/32824251000.html for $2.20


This next image shows you how the keypad is wired internally


The examples use the same GPIO pins as Sparkfun Electronics COM14662. If you’re using a different keypad you’ll need to look at the documentation and maybe make changes.

The Python code uses the Raspberry Pi’s internal pull-up resistors, otherwise you’d need a 10k resistor on each col line to stop the GPIO 4/17/22 inputs floating around between 1 and 0.

The software that figures out which button was pressed first scans all the col lines for an input and then switches the GPIO inputs around and scans the row lines instead, to determine exactly which key was pressed. Fortunately there’s some existing Python code to do this for us:

http://crumpspot.blogspot.com/2013/05/using-3×4-matrix-keypad-with-raspberry.html

matrixKeypad_RPi_GPIO.py

matrixKeypad_test.py

I cut and pasted both examples into a nano editor session and saved them, but they’re also in our demo zip file. You can get that with:

wget www.securipi.co.uk/keypad.zip
unzip keypad.zip

You can run the demo with

python matrixKeypad_test.py

and you’ll be able to enter a 4 digit pin and see it printed.

We also built our own working alarm system demo using a PIR movement sensor connected to pins 5V, GND and GPIO8 which you can run with

python alarm2.py

This script lets you input a 4 digit pin. If you enter the correct pin, which is 5678, then the alarm will arm. Once the alarm is armed, any movement detected by the PIR will print a movement detected message to the console. There are other scripts that build on this to email you a photo of the intruder and write the time and date of PIR alerts to a log file.


from matrixKeypad_RPi_GPIO import keypad
from time import sleep
import RPi.GPIO as GPIO
import os

digitCount = 0
pin = [0,0,0,0]
finalPin = "0000"
validPin = "5678"
armState = 0
pirPin = 8

GPIO.setmode(GPIO.BCM)
GPIO.setwarnings(False)
GPIO.setup(pirPin, GPIO.IN)

# Initialize the keypad class
kp = keypad()

def digitreturn():
    # Loop while waiting for a keypress
    r = None
    while r == None:
        r = kp.getKey()
        pirtest()
    return r

def message():
    os.system('clear')
    print("Please enter a 4 digit pin using the keypad")

def pirtest():
    if GPIO.input(pirPin) and armState == 1:
        print("Movement Detected. Intruders!")
        sleep(3)
message()

while True:
    digit = digitreturn()
    print digit
    pin[digitCount] = digit
    digitCount = digitCount + 1
    sleep(0.25)
    if digitCount == 4:
        finalPin = (str(pin[0]) + str(pin[1]) + str(pin[2]) + str(pin[3]))
        print(finalPin)
        if validPin == finalPin:
            print("You entered the correct PIN")
            if armState == 0:
                print("alarm will arm in 5 seconds, get out now")
                sleep(5)
                print("armed")
                armState = 1
                sleep(1)
                message()
            elif armState == 1:
                print("alarm is now disarmed")
                armState = 0
        digitCount = 0

and this version will take a time and date stamped photo of the intruder for you

import picamera
from matrixKeypad_RPi_GPIO import keypad
from time import sleep
import RPi.GPIO as GPIO
import os
import datetime

digitCount = 0
pin = [0,0,0,0]
finalPin = "0000"
validPin = "5678"
armState = 0
pirPin = 8
camera = picamera.PiCamera()

GPIO.setmode(GPIO.BCM)
GPIO.setwarnings(False)
GPIO.setup(pirPin, GPIO.IN)

# Initialize the keypad class
kp = keypad()

def digitreturn():
    # Loop while waiting for a keypress
    r = None
    while r == None:
        r = kp.getKey()
        pirtest()
    return r

def message():
    os.system('clear')
    print("Please enter a 4 digit pin using the keypad")

def pirtest():
    if GPIO.input(pirPin) and armState == 1:
        now = datetime.datetime.now().strftime("%y-%m-%d--%H-%M-%S")
        print("Movement Detected " + now + ".  Taking a photo")
        camera.start_preview()
        sleep(3)
        camera.annotate_background = picamera.Color('black')
        camera.annotate_text = datetime.datetime.now().strftime('%Y-%m-%d %H:%M:%S')
        camera.capture('/home/pi/' + now + 'image.jpg')
        camera.stop_preview()


message()

while True:
    digit = digitreturn()
    print digit
    pin[digitCount] = digit
    digitCount = digitCount + 1
    sleep(0.25)
    if digitCount == 4:
        finalPin = (str(pin[0]) + str(pin[1]) + str(pin[2]) + str(pin[3]))
        print(finalPin)
        if validPin == finalPin:
            print("You entered the correct PIN")
            if armState == 0:
                print("alarm will arm in 5 seconds, get out now")
                sleep(5)
                print("armed")
                armState = 1
                sleep(1)
                message()
            elif armState == 1:
                print("alarm is now disarmed")
                armState = 0
        digitCount = 0

This version will send you a photo of the intruder as an email attachment

import picamera
from matrixKeypad_RPi_GPIO import keypad
from time import sleep
import RPi.GPIO as GPIO
import os
import datetime

#email setup below
from email.MIMEMultipart import MIMEMultipart
from email.MIMEText import MIMEText
from email.MIMEImage import MIMEImage
import smtplib


digitCount = 0
pin = [0,0,0,0]
finalPin = "0000"
validPin = "5678"
armState = 0
pirPin = 8
camera = picamera.PiCamera()

GPIO.setmode(GPIO.BCM)
GPIO.setwarnings(False)
GPIO.setup(pirPin, GPIO.IN)

# Initialize the keypad class
kp = keypad()

def digitreturn():
    # Loop while waiting for a keypress
    r = None
    while r == None:
        r = kp.getKey()
        pirtest()
    return r

def message():
    os.system('clear')
    print("Please enter a 4 digit pin using the keypad")

def pirtest():
    if GPIO.input(pirPin) and armState == 1:
        now = datetime.datetime.now().strftime("%y-%m-%d--%H-%M-%S")
        print("Movement Detected " + now + ".  Taking a photo")
        camera.start_preview()
        sleep(3)
        camera.annotate_background = picamera.Color('black')
        camera.annotate_text = datetime.datetime.now().strftime('%Y-%m-%d %H:%M:%S')
        camera.capture('/home/pi/' + now + 'image.jpg')
        camera.stop_preview()
        # Send an email section. Make a new gmail account just for your Pi to use.  Then enable "less secure apps"
        # https://www.google.com/settings/u/0/security/lesssecureapps
        msg = MIMEMultipart()
        msg.attach(MIMEImage(file('/home/pi/' + now + 'image.jpg').read()))
        mailer = smtplib.SMTP('smtp.gmail.com:587')
        mailer.starttls()
        # Login and password of your new gmail address go here
        mailer.login("myraspberrypi","password")
        # Recipient is the regular email account on your phone or PC.
        mailer.sendmail("myraspberrypi@gmail.com", ["recipient@gmail.com"], msg.as_string())
        mailer.close()

message()

while True:
    digit = digitreturn()
    print digit
    pin[digitCount] = digit
    digitCount = digitCount + 1
    sleep(0.25)
    if digitCount == 4:
        finalPin = (str(pin[0]) + str(pin[1]) + str(pin[2]) + str(pin[3]))
        print(finalPin)
        if validPin == finalPin:
            print("You entered the correct PIN")
            if armState == 0:
                print("alarm will arm in 5 seconds, get out now")
                sleep(5)
                print("armed")
                armState = 1
                sleep(1)
                message()
            elif armState == 1:
                print("alarm is now disarmed")
                armState = 0
        digitCount = 0
 Posted by at 8:46 am

Setting up OpenCV 3 and Python 3 on a Raspberry Pi 3 for face detection using Raspberry Pi Camera or USB Webcam

 Raspberry Pi  Comments Off on Setting up OpenCV 3 and Python 3 on a Raspberry Pi 3 for face detection using Raspberry Pi Camera or USB Webcam
Mar 222018
 

OpenCV is an open-source framework for computer vision. It’s used for self-driving cars, surveillance, CCTV, traffic flow measurement, autonomous robots, license plate recognition, gesture recognition, and just about any other application where a computer needs to “see”.

You’ll have seen OpenCV in action whenever you’ve watched a surveillance scene in a film or documentary showing boxes being automatically drawn around moving people or cars on a computer screen.

OpenCV 3.3.0 runs well on a Raspberry Pi 3 using either the Pi camera module, USB webcam or USB video grabber and CCTV camera. Our examples run in Python 3. We have different code examples for the Pi camera and USB webcam/video grabber.

Here’s face recognition running on a Raspberry Pi 3 with the Raspberry Pi NoIR camera module

And here’s my CCTV system hooked up to the Raspberry Pi using a USB video grabber

This script looks for movement in the right of the image and saves time and date stamped photos of intruders to the Raspberry Pi’s micro SD card.

It would be quite easy to have it email the photo to you also.

There’s a full PDF guide with download links for our Python scripts here: https://www.securipi.co.uk/OpenCV.pdf

Here’s what each script does:

test-video-picam.py – shows a live feed from the Pi camera on your Desktop

find-faces-picam.py – displays a box around any face found in the Pi camera feed

find-faces-picam2.py – as above but records time stamped photos to SD card too.

mog-picam-1.py – Uses Mog2 background subtractor, takes a photo of large items on the left.

mog-picam-2-.py – as above but with erosion and dilation filters too.

Also similar examples for USB webcam or USB video grabber, without the picam titles:

test-video.py – shows live vide feed from USB webcam or USB video grabber.

find-faces.py – finds faces in the video feed and draws a box around them.

mog.py – Uses Mog2 background subtractor to find intruders and cars on our CCTV camera.

By comparing test-video-picam.py and test-video.py you can see exactly how to modify other OpenCV Python scripts for use with Raspberry Pi camera or USB webcam.


You can buy the OpenCV3 compatible USB video grabber we used, that will let you attach any video device with a composite output to your Pi, here:

https://www.amazon.co.uk/dp/B072Q4MNKM

https://www.amazon.com/dp/B072Q4MNKM

 Posted by at 9:34 am

Alarm Board for BBC Microbit with PIR, Buzzer and Door/Window contacts terminal

 Microbit  Comments Off on Alarm Board for BBC Microbit with PIR, Buzzer and Door/Window contacts terminal
Nov 242017
 

We’ve recently had some PCBs made that allow you to attach a PIR movement sensor, buzzer, and magnetic door sensor to your micro:bit.

The PIR movement sensor is wired to pin 0 on the micro:bit, the magnetic door sensor contacts connect to pin 1, and the buzzer is wired to pin 2.

You can use the board as the basis for lots of different projects. You can make several micro:bit alarm boards talk to each other using the Radio function. You can attach the micro:bit to your PC or Mac and use Thonny/Python3 to read serial line messages from the micro:bit and send an email to your phone whenever the sensors are triggered or write events to a log file. The PDF manual contains examples of both.

Our PDF manual for the Alarm Board can be downloaded from http://www.securipi.co.uk/alarmbit.pdf

You can buy a ready-assembled board with the PIR sensor, magnetic door contacts and 3 metres of cable from Amazon for £13.99 https://www.amazon.co.uk/dp/B0778WBMJB

Here’s what the Thonny/Python3 code looks like running on a Windows 7 PC. This code reads “Serial Line” messages from the micro:bit’s USB port and stores the time and date of alarm triggers in a log file. Read our PDF manual to see more examples.

We can also supply the Alarm Board in a self-assembly kit that you solder together yourself for £7.95 https://www.ebay.co.uk/itm/162765653352

The PIR modules we supply have been modified to work at 3 volts (there’s a page explaining how to do that in our PDF manual).

 Posted by at 11:06 am

Senior Guardian Project for Raspberry Pi with PIR sensor

 Raspberry Pi  Comments Off on Senior Guardian Project for Raspberry Pi with PIR sensor
Jul 112017
 

The Senior Guardian project uses a PIR motion sensor to discretely keep an eye on an older vulnerable relative who lives alone.

Each time a person walks past the PIR sensor it adds one to the number of movements detected that hour. It stores the number of movements detected each hour in a Python list and can send an email to your PC or phone that looks like this:

If you didn’t see any PIR detections at times you’d normally expect them to be up & around, then you could call them up to check everything’s okay or get a neighbour to check on them.

The PIR sensor attaches on GPIO pin 4 and is wired up like this:

or you could use one of our PIR Adapter Clips if you don’t want to use cables.

This version of the Python script (pir5.py) emails a copy of today’s log to two different email addresses once an hour (there are other variations in our download)

Download our free PDF Guide : Senior Guardian PDF guide

Download the Senior Guardian scripts direct to your Pi with

wget www.securipi.co.uk/sg.zip
unzip sg.zip

Buy a PIR with Cables and GPIO pin card £3

Buy a PIR Alarm kit for Raspberry Pi £11.99

 Posted by at 8:56 am

AIY like Voice Recognition and Control using Google Cloud Speech API on a NextThingCo CHIP SBC

 NextThingCo C.H.I.P  Comments Off on AIY like Voice Recognition and Control using Google Cloud Speech API on a NextThingCo CHIP SBC
Jun 282017
 

In our previous post we showed you how to use a Raspberry Pi and a USB audio adapter to make a MAX9812 room mic that can listen out for commands and read out the news, share prices, weather, time and turn an LED on or off. This is basically the same thing, but with the mic wired directly to the CHIP’s Mic in port.

The software listens out for the keyword “Oscar”. Once it hears the keyword it then listens out for the words “News, Weather, Shares, Light On, Light Off or Time”.

If you want to control an LED using the “Light On” or “Light Off” commands, then you need to wire this up too:

The full PDF instructions (2 pages A4) http://www.securipi.co.uk/vrchip.pdf

Software ZIP file http://www.securipi.co.uk/vrchip.zip

You can buy a £9.99 kit of the Mic, breadboard, cables and components at http://www.ebay.co.uk/itm/Voice-Recognition-kit-for-Google-Cloud-Speech-API-AIY-on-Pocket-Chip-C-H-I-P-/162594971425? (we ship worldwide)

 Posted by at 9:05 am

Voice Recognition and Command with a Raspberry Pi and Google Cloud Speech API

 Raspberry Pi  Comments Off on Voice Recognition and Command with a Raspberry Pi and Google Cloud Speech API
Jun 192017
 

Plug in a USB microphone

Increase mic volume for USB device to full using

alsamixer

Screenshot - 150617 - 11:14:09

(F6 to change to USB device and arrow keys move across to Mic and up arrow increases volume to full, Esc to quit)

Make a test recording:

arecord -D plughw:1,0 -f S16_LE test.wav

CTRL-C to quit

aplay test.wav

Sign up to Google cloud platform for free

https://console.cloud.google.com/start

google-cloud

Google Cloud Speech API -> go to Credenitials tab -> Create Credentials -> API Key -> cut and paste your API key for use in speechAnalyser.py later

sudo apt-get install mplayer

sudo apt-get install sox

sudo apt-get install flac

sudo apt-get install python-pycurl

sudo apt-get install python-pip

sudo pip install feedparser

sudo pip install yahoo-finance

search for stock/share symbols at https://uk.finance.yahoo.com/lookup/ and edit getShares.py to suit.
while in folder /home/pi pull ZIP file from our server with

wget www.securipi.co.uk/vr.zip

unzip vr.zip

chmod a+x speech.sh

edit speechAnalyser.py so it contains your Google Cloud Speech API key

nano speechAnalyser.py

save it and exit

run it while connected to the internet

python speechAnalyser.py

say the trigger word “oscar”, wait for a beep, and then say either “news, weather, shares, time, light on, light off, flatter me”

(light on & light off control a red LED with a 220 ohm resistor connected to GPIO4 and GND pins)

You can make a really good room mic, with 15 feet range, using a USB audio adapter and a MAX9812 amplified microphone (cost about £5 for both items on eBay)

usb-mic

You can download our 3D print case design from

http://www.securipi.co.uk/usb-mic-holder.stl

usb-mic-case

Use a hot-glue gun to secure the boards in place.

http://www.securipi.co.uk/vr.pdf
http://www.securipi.co.uk/vr.zip

With thanks to these web pages:

https://randomconsultant.blogspot.co.uk/2017/01/building-amazon-echo-like-device-with.html
and
https://pypi.python.org/pypi/yahoo-finance

 Posted by at 8:13 am

Home Automation and Security projects book released for Raspberry Pi by Tim Rustige

 Uncategorized  Comments Off on Home Automation and Security projects book released for Raspberry Pi by Tim Rustige
May 152017
 

Home Automation and Security projects book for Raspberry Pi

raspberry2(1)

Our latest ebook is now available to download instantly in PDF format from www.trcomputers.co.uk and as a Kindle eBook from Amazon at https://www.amazon.co.uk/dp/B071LC88M1

You can download a Sample PDF

Contents:

Chapter 1 – Wireless Doorbell project for under £20/$25.
We show you how to receive signals from a Lloytron MIP wireless doorbell push on your Pi, and have your Pi take a photo from a Raspberry Pi camera module, time & date stamp it, and email it to your phone. We also show you how to play a custom MP3 door chime sample when the doorbell is pressed – your doorbell can now be any MP3 sound you like. Also works with Lloytron MIP wireless door sensors, wireless PIRs and other generic wireless driveway alarms. We also show you how to take pictures from USB webcams, USB video capture devices, scan for Bluetooth & WiFi MAC addresses when the doorbell is pushed or sensor triggered.

Chapter 2 – Reverse-engineer 433MHz & 315MHz wireless gadgets using £10/$12 of hardware.
Learn how to receive/clone codes from remote controls and re-transmit signals to wireless remote control mains sockets, relays and light switches that operate at 433.92MHz (Europe) or 315MHz (North America) AM and use Manchester/OOK encoding using your Pi. Learn codes and then turn lights, relays and power sockets on and off at set times using Python. Control lights, relays, and power sockets from a web page on your phone or tablet. We also include a Python script that can capture a wireless code & replay it, or replay a different code with the same timing values, or a range of codes. (no more time wasted messing about with Audacity, Inspectrum, RTL-SDR, Baudline and GNU Radio).

Chapter 3 – How to control hardware from a web browser.
Learn how to use Apache web server on your Pi to interact with a web page on your phone. Contains Javascript/CGI and PHP examples. Turn an LED on and off from anywhere using two buttons on your phone’s web browser. Turn remote control mains sockets, lights and relays on and off from anywhere using buttons on your phone’s web browser.

Chapter 4 – Working with CCTV audio on your Pi.
Learn how to stream high quality CCTV audio from one place to another. We show you the best hardware to use.

Chapter 5 – Make a pan and tilt CCTV mount for your Raspberry Pi camera for around £12/$15.
We show you how to control two SG90 mini servos and a pan tilt bracket from your Raspberry Pi. Control the camera using graphical buttons and sliders on your Pi’s desktop. Stream video to VLC media player at remote location and control camera via SSH. Stream video to a remote web browser and remote control pan and tilt from same web browser window.

 Posted by at 8:19 am

TwistCam – A Motorised CCTV Security Camera using Raspberry Pi Zero W

 Raspberry Pi  Comments Off on TwistCam – A Motorised CCTV Security Camera using Raspberry Pi Zero W
Mar 212017
 

CIMG3152

To make this security camera project you’ll need:

  • Raspberry Pi Zero W
  • Raspberry Pi camera module
  • SG90 micro servo
  • Micro SD card with latest Raspbian Jessie
  • 3D printed bracket and base
  • 8x Nylon M2 nuts and bolts
  • 20x 2p coins to weight the base down

The STL files to print the brackets are at www.securipi.co.uk/twistcam.zip

CIMG3153

and you can edit the original files at:

https://www.tinkercad.com/things/jSjNEIT4z5V-twistcam-base-4-raspberry-pi-zero-w-and-servo-cctv-surveiilance

https://www.tinkercad.com/things/i6WyzsOBSMX-twistcam-using-raspberry-pi-zero-w-and-servo-cctv-surveiilance

CIMG3154

Before attaching the Raspberry Pi and camera to the 3D printed parts, it’s a good idea to do the following at the Desktop -> Preferences ->Raspberry Pi Configuration:

  • Enable SSH
  • Change passwords for Pi and Root users to something secure and hard to guess.
  • Enable the camera
  • Boot to CLI

Reboot the Pi and login to the terminal

sudo iwlist wlan0 scan

will show WiFi routers near your Pi

sudo nano /etc/wpa_supplicant/wpa_supplicant.conf

and add these lines at the bottom, using your routers SSID name and password

network={
ssid="testing"
psk="testingPassword"
}

Save the file, exit and reboot your Pi. It should now auto-attach to your wireless network when it boots up.

The servo wires can be soldered directly in place, or use a Pimoroni GPIO hammer header and cables instead.

twistcam1_bb

Assemble all the parts together

We’re using the open-source ServoBlaster code to control the servo from the BASH command line.

We install it like this:

mkdir twistcam

cd twistcam

wget https://raw.githubusercontent.com/richardghirst/PiBits/master/ServoBlaster/user/servod.c

wget https://raw.githubusercontent.com/richardghirst/PiBits/master/ServoBlaster/user/Makefile

wget https://raw.githubusercontent.com/richardghirst/PiBits/master/ServoBlaster/user/init-script

wget https://raw.githubusercontent.com/richardghirst/PiBits/master/ServoBlaster/user/mailbox.c

wget https://raw.githubusercontent.com/richardghirst/PiBits/master/ServoBlaster/user/mailbox.h

make servod

sudo ./servod

Then test it’s working with:

echo 5=50% > /dev/servoblaster

echo 5=10% > /dev/servoblaster

echo 5=90% > /dev/servoblaster

The commands above move servo number 5 (Pan left & right) on GPIO23 between centre (50%),
left (10%) & right (90%) positions

Setup Video Streaming to a web browser.

On your Raspberry Pi, while in the twistcam folder we made earlier:

sudo apt-get install libav-tools git python3-picamera python3-ws4py

Download the zip file with:

wget http://www.securipi.co.uk/tcs.zip

unzip tcs.zip

chmod a+x *.sh

python3 server.py

Then go to another PC on your network and open a web browser to:

http://ip-address-of-your-pi:8082/

back-room

And you should be able to pan the camera left and right using the slider, with hardly any lag.


Disable the red LED on the camera.

When you’re streaming video, you might not want anyone to know when the camera is active. It’s possible to turn off the camera’s red activity LED by doing this:

sudo nano /boot/config.txt

And at the end of the file add the line

disable_camera_led=1

Save and reboot your Pi.

Mounting the twistcam upside down.

The Twistcam is designed to sit on a flat surface the right way up, but if you mount it upside down , hanging from a ceiling or shelf then the video will be upside down and the pan controls the wrong way around. You can fix it by downloading this patch and overwriting the original server.py file.

wget http://www.securipi.co.uk/server.py


Start video streaming automatically at boot.

Edit /etc/rc.local so that servod and python3 server.py launch at startup.

nano /etc/rc.local

Insert these lines before the last line which says exit 0

cd /home/pi/twistcam
sudo ./servod
python3 server.py

Save the file and reboot your Pi. Video feed can be controlled from PC or phone.

phone2

If you don’t have access to a 3D printer, you can buy the two 3D printed brackets and 8x nylon M2 nuts and bolts here for £11.99 inc VAT.

(Raspberry Pi, Camera and SG90 servo NOT included)


Quantity :


We ship worldwide. Next day delivery in UK and 14 days for delivery worldwide.

 Posted by at 7:27 pm

Simple LED and switch project for Redfern Crumble board

 Redfern Crumble  Comments Off on Simple LED and switch project for Redfern Crumble board
Feb 132016
 

Simple LED and switch project for Redfern Crumble board

This project uses:

1x Red LED

1x Push button switch

1x 270 ohm resistor

4x DuPont cables or croc-clip leads

crumble4

flat short-legged side of the LED connects to the resistor & black wire.

resistor can be 220 ohm if you don’t have any 270 ohm.

The Crumble program waits until the button is pushed and turns the LED on for 5 seconds, then turns it off.

program

You program the Crumble by dragging blocks across from the left to the right

Try changing the program so the light only stays on for two seconds. Try changing the program so the LED flashes on and off twice.

Here’s how we power the Crumble

CIMG2739

we soldered pin posts onto our Crumble board so we can use standard Arduino breadboard cables with it.

the Crumble board is sat on our 3D printed holder, which you can download from securipi.co.uk/crumble_crib.stl

 Posted by at 2:58 pm